Tag Archives: jazzmaster

An Open[ish] Response to Fender CEO Andy Mooney’s Thoughts on Offset Guitars

A bad guitar, 1961

In a recent interview with Reverb.com, Fender CEO Andy Mooney laid bare his true feelings about the Jazzmaster and Jaguar, and let me tell you, they were anything but glowing. In the exchange, he brands Leo Fender’s original designs as “not very good guitars” at the time of release, declaring the mistakes of the past fixed in Fender’s latest entries into the offset line. 

Mooney takes a hard stance here, but to be honest his perspective here is nothing new. These critiques have been around for years, and even with the informed views of dedicated users of the Offset Guitar forum, the main axe associations with high profile players like Chris Stapleton and Nels Cline, and my own work over the last decade advocating for the guitars in print and performance –– pardon the horn tooting –– opinions on these fascinating guitars among the general populace are still very much divided.  

I don’t blame folks for holding these opinions because even I, Dear Reader, once believed the very same things. Back in high school I had an Olympic white Japanese Jaguar, a parental purchase spurred on by my love of the band Bush. The kindest way I could describe the guitar is problematic; the strings skipped off of their saddles, the bridge shimmied down, and it would not stay in tune no matter what I did. 

Eventually I traded it in on something more reliable, unwilling to wrestle with the instrument. When I finally came back to the offset guitar 14 years later, I realized that insatiable tinkerer Leo Fender wouldn’t have released a guitar he didn’t think was ready, and so I pushed through my preconceived notions of its flaws to gain a better understanding of the thing. I came out on the other side with a deeper appreciation for the man’s work. 

It seems to me that when a player has a bad experience with these guitars, it’s often because they’ve been poorly maintained. In cases such as these, I view it as an opportunity to educate and reevaluate. After a conversation or a quick adjustment, the player might still decide the models aren’t for them, but more often than not they seem to “get it.” And that’s enough for me.

So here I am, returning from an extended hibernation like a grumpy, shaggy bear; like the aging ensemble cast of a ‘90s sitcom, lured into a reunion for the cameras by the dangling carrot of a handsome payday, each secretly knowing that the end product would not be nearly as good as the show’s initial run; like a cherished childhood movie that, upon re-viewing for the first time in 30 years, has way more adult themes than your young mind could then comprehend, causing feelings of retroactive discomfort because you watched it with your parents in the SAME ROOM???

Prodigal namesake that I am, I have returned with my proverbial pen pressed to the also proverbial page of the Guitar Bar website to feverishly scrawl this open[ish] response in an attempt to give some context and gentle rebuttal to his comments. 

“They were not particularly good guitars when they were first introduced.”

When the Jazzmaster and Jaguar were first released in 1958 and 1962 respectively, they were not only top of the line models, but top sellers as well. While neither model was exactly embraced by the Jazz community, they nonetheless found favor with a varied group of players and all but defined the sound of Surf music while still in its infancy. For a time, they seemed to be everywhere. Admittedly, perceived popularity does not a good guitar make, so let’s look at a handful of early adopters.

At first, session players and country pickers liked the models well enough to use them on stage and in the studio, including Wayne Moss, Hank Garland, Willie Nelson, and Luther Perkins, who has an engraving of the model on his tombstone. If more proof is needed, here are three separate performances of Roy Clark absolutely shredding “12th Street Rag” on a bone stock Jazzmaster and Jaguar. These videos remain favorites of mine because they show someone really digging in and playing fast melodic runs on guitars that people seem to think can’t handle that kind of vigorous right hand technique. 

But if they were so good to begin with, why did sales eventually taper off?

A refinished ’65 from a couple of years back. I actually put the stock bridge back on this one instead of the sloppily installed TOM. It was awesome.

Previously, I’ve explained that the most common complaints with the model aren’t the fault of the design, but rather, trying to make that design do things it was never intended to do: wearing a set of light gauge strings.

In the Jazzmaster, Leo Fender’s intention was to appeal to Jazz guitarists by creating a solid body guitar with the string geometry of an archtop: a pitched-back neck, a floating bridge, and a tailpiece, and most importantly, all specifically designed to work with heavy gauge flat wound strings. We’re talking 12s, 13s, and 14s. 

Once lighter gauges (9s and 10s) became the norm in the early to mid 1960s, inadequate string tension reduced the downward force on the bridge, resulting in tuning problems and string skipping. It’s like going off-roading with bald tires: you can certainly do it, but expect to slide around a bit.

At this point in my career I’ve set up well over a thousand of these guitars, and in the overwhelming majority of cases, once you throw on a set of 11 gauge rounds and shim the neck as Leo intended, they just work. They were good guitars then, and they’re still good guitars today.

For more information on setting up these guitars, have a look at our Demystifying series and my May 2017 cover story for Premier Guitar. 

“We’ve made them functionally better”

It’s true that Fender has devoted a significant amount of time and resources into solving the perceived problems with these guitars, including modified vibrato positioning, redesigned bridges, strategically placed nylon bushings, and even neck pockets angled at the factory to eliminate the need for shims. These are all good ideas, a few even great; as is often the case when chasing mass appeal, some have not been as successful as Fender might have hoped.

Take the Classic Player, which features an angled neck pocket and an Adjust-O-Matic bridge yet can still fall prey to the same string path issues of more vintage-correct models. The AOM style bridge was not designed with a vibrato in mind, with sharp, shallow saddle slots that can cause tuning problems of their own. And that’s to say nothing of the mismatched 12” radius bridge on a 9.5” neck, which causes the E strings to be higher off of the fretboard than the D and G in the middle and makes for an inconsistent feel across the neck. 

My friend Brian’s wonderful later model MarrGuar. An amazing guitar that set up beautifully.

Mooney specifically mentions the Johnny Marr model –– indeed a killer guitar ––  yet it’s worth noting that many of the earliest of the bunch left the factory with 56mm bridge string spacing, which turned out to be only a hair slimmer than the width of the neck. Many players reported problems keeping the outer strings on the fretboard, which eventually led to Fender adopting slimmer 52mm spacing in later production runs (linked in case you need one). Here’s a shot of a lovely black one with the worst example of this I have yet to see. 

Strangely, the earliest American Professionals which came a few years later had the same problems, sometimes necessitating the need for aftermarket parts and prompting another mid-run update. 

As for the new American Ultra guitars, they may not be for me but I can understand why many of the features might appeal to other players looking for a more modern take on the Jazzmaster. With an additional lead circuit control knob, a re-purposed rhythm circuit layout for out of phase operation, rollers for individual pickup volumes, and an S-1 switch for series options, it could be argued that functionally they’re more complex than ever. 

However, once agin Fender curiously employs a mismatched bridge radius, this time a 9.5” bridge mated to a compound 10-14” radius neck, which puts the D and G strings higher off of the fretboard than the Es. Generally, compound necks work best when the string path is treated as a cone, flattening as it expands. In this case, a 16” bridge radius would set up far better than that of the stock part. I suspect we’ll start seeing even these guitars sporting alternative bridges before too long. 

So yes, while it’s good that we’re seeing R&D dedicated to making adjustments, some of those adjustments haven’t actually solved the problems, but rather, changed the nature of them instead.

“Now you can actually play them.”

I’ve made this point abundantly not only in this piece but in nearly everything else I’ve done over the years, but the fact is that Jazzmasters and Jaguars were always playable –– stock bridge included. Take it from an ardent Mastery user: the original bridge is as viable as any other, and once it’s adjusted correctly it’s as fun as it is functional.

Not only is there a wealth of great music made with them over the years as proof, you can refer to articles on this blog, numerous posts on both my personal Instagram as well as Mike & Mike’s showing that the stock bridge is dependable and musical. Hell, every offset guitar the shop sells goes through the same setup process to show off what incredible instruments they can truly be with just a little extra effort.

Closing Arguments

Would you play this stripped ’61, original bridge and all? It was a total beast of a guitar.

Real talk: I get that Mooney’s comments may be a marketing tactic to steer customers toward the current lineup in the Fender catalog, and just in time for the holidays at that. You know the old song and dance: newer is better! Fender does make a great guitar and innovation can be a good thing, so to this I say, fair play. 

Still, I have to believe there’s a better way to say so without throwing heritage –– and our beloved vintage instruments –– under the bus. 

You see, over the last five or so years, it seems to have become fashionable in Fender’s corporate culture to downplay or outright disparage the legacy of Leo Fender, with reps at NAMM overheard saying things like “Leo didn’t get everything right” and “we fixed his mistakes,” phrases repeated at the onset of the latest feature set or spec tweak. 

At best, comments like those in the previous sentence (as well as those which are the basis of this response) make Fender seem out of touch, and at worst, could erode the trust of a very loyal legion of customers.

I’ve said it before, and I’ll be saying it for as long as it needs saying: the Jazzmaster and Jaguar are Leo Fender’s most brilliant and misunderstood designs. It may have taken us 50 years to catch up, but now a growing and dedicated group of fans have found a unique sound here unlike anything you can get from other more traditional guitars. 

Speaking personally, no matter what other instruments are available to me, I reach for an offset first. I have found my musical voice in the Jazzmaster and Jaguar, and I’m never more comfortable or more adventurous than when I have one in my hands.

One last quote: 

“I have Jazzmasters and Jaguars… I have four in a line on my wall from 1966.” 

Andy, if you’ve read this and have found any of it compelling, I’d love the chance to show you just how good those guitars on your wall can be. All I’ll need is a few sets of 11s or 12s, a screwdriver or two, and maybe a couple Cold Ones to share between us. Burritos are good, too.

Oh, and parking validation –– it’s a bit of a drive up from Long Beach and the last thing I want to deal with is finding a spot on those notoriously crowded Hollywood streets.

A bad guitar. A very bad guitar


Tagged , , , , , , , , , , , , , , , , , , , , ,

Kinman “Nasty 90” Noiseless Jazzmaster Pickups: Make Noise without the Noise

Recently I was tasked with installing two Kinman “Nasty 90” P90 pickups into this Fender ’62 AVRI Jazzmaster. Already a great guitar, I was excited to hear how the Kinman pickups changed the sound compared with the stock Fender pickups I know so well. I spent time with Kinman pickups at some convention hall guitar gathering a few years back, and although I remember liking them I think we can all agree that guitar shows are among the worst places to actually hear how a thing sounds. The prospect of demoing them in the quiet comfort of my own home was alluring, to say the least.

Before you ask, yes, I totally forgot to take more pictures

Generally speaking, I come away from other noiseless pickups feeling like I was given a raw deal; it seems that the trade-off for hum-free operation is the loss of some pleasant frequencies as casualties of the noise cancellation process. Yet Kinman are widely praised for their ability to retain the tonality of classic single-coil pickups while eradicating 60 cycle hum in their trademark elegant and complex manner––the Nasty 90 pickups have over 200 parts!

Hype, hearsay, or honesty? The real question is, how’d they fare?

Pretty damn well, I’d say.

Installation

Installation of the pickups went smoothly, but was a bigger job than most simple pickup swaps. While Kinman’s proper Jazzmaster pickup is a drop-in replacement, the Nasty 90 pickup has a rather tall assembly, far too tall to install without routing. I removed about 5/8” of wood from the neck pickup rout and a little less in the bridge position. The Kinman website recommends removing 10mm from each cavity, but I wanted a little more room for hard foam so height adjustment was easier down the line. Anyway, I’d rather take a little too much than to have to do the job over again.

Additionally, the dimensions of these pickups also meant that I had to remove the big brass shielding tub present on this stock Fender Jazzmaster. The deeper pickups couldn’t be installed with the tub overhanging into the pickup routs, where it normally meets up with the brass plates found beneath the pickups. I also had to remove those plates, which I made up for with some foil tape as described in my previous article. This proved only to be a minor setback.

Once placed in their respective positions, the pickups were just as easy to connect to the wiring harness as any other pickup. The fit of those lovely black covers in the pickguard was snug but not too tight. I did note, however, that the pole piece spacing was a bit slim for the Mustang bridge installed on this guitar, so the pole pieces never quite lined up with the strings. Kinman offers multiple spacing options and I suspect that the spacing here would line up perfectly with a Mastery or Staytrem bridge.

Even with the very simple installation process, the Kinman website refers you to installation guides which I did not consult, locked away in the “members area” for which I did not register on principle. It’s puzzling that information deemed to be crucial is kept out of reach of a simple internet search; in any case, nothing untoward popped up during this job.

Implementation 

Let me say that these pickups sounded good. As is my test for good, growly P90s, I fired up my ’79 Marshall, cranked the gain, and chugged out the rhythm part from Weezer’s “The World Has Turned and Left Me Here,” which I contend has some of the most massive sounds ever committed to tape. As I’d hoped, the Kinman Nasty 90s handled those tight inversions beautifully, exhibiting all of the colossal midrange I expect––nay, demand––from P90s.

The neck offered woolier tones while the bridge felt punchy and loud. As a guy who purposely runs bright guitars into dark amps, I did find the Nasty 90s to be a tad dark for my tastes. Even with the brightness of my ’65 Bassman piggyback, the pickups seemed to slightly favor midrange honk over treble clarity. This is the conceit of the Nasty 90 model, which the Kinman website calls “dark and syrupy” so I wouldn’t say I’m surprised or disappointed. I suspect that, were I to order a set, I’d be much happier with the standard Jazzmaster set or even the Clear or Sweet 90s models. If brightness is your bane, the Nasty may be just the right tincture.

And indeed, they were Q-U-I-E-T. So quiet, so noiseless were they that I found them a bit unnerving, as if my living room had become a vacuum. At first I even wondered if my amp was on, and it wasn’t until I slapped the strings did I realize that yes, it was on, and yes, I needed to turn down before the neighbors complained.

Impressions

I would wholeheartedly recommend these pickups to anyone frustrated by the excessive noise of their favorite single coil pickups. I think that Kinman’s done a remarkable job harnessing some of the magic of classic pickups while forging their own path on the quest for tone. After playing these pickups for the better part of a morning, I quite liked their sound and response, and at one point I totally forgot that I was playing a noiseless pickup.

The extra routing required for the P90 set is off-putting both from the extra work involved, and if you can’t do it yourself, the added expense of hiring a tech. Again, this isn’t an issue with the Kinman Jazzmaster set, yet worth noting for Jazzmaster owners looking for an easy P90 swap. And at $189USD each plus shipping from the Philippines, they aren’t the cheapest pickups around. But hey, you’re not here for cheap; if Kinman’s in your sights, then you’re after something special and you’ve likely factored in a premium price already.

If you’re in the market, the Kinman set should definitely be on your list. In future, I hope to get my hands on the Jazzmaster set for a direct comparison with my other guitars.

https://kinman.com/index.php

Just One More Thing…

And if you’ll indulge me one Columbo reference, the Kinman Jazzzmaster page makes the following claim:“Kinman transforms Jazzmaster into THE BEST Fender guitar.” These pickups are great, mind you, but lemme let you in on a little secret…
Come close.
Closer.
C L O S E R .


(it already is)
Tagged , , , , , , , , , , , ,

SPITFIRE (You’ll Get Caught Up In The…)

They say money can’t buy happiness, but scoring a deal on a roughed-up 1963 Jaguar is pretty damn close. The guitar in question retained all of its original hardware and even the case, but because it had been poorly refinished in a horribly thick, yellowed-out white, it could be had at a deep discount. I had been looking for a project Jaguar to utterly ruin for some time, so I jumped on it.

As soon as it arrived, I set about the task of stripping the finish, which had the texture of a Pringle’s chip. I sent the body off to be refinished by the incomparable Joe Riggio, whose spot-on work truly deserves its own blog post. When it came back, the Charcoal Frost Metallic finish was perfect and the aging was tasteful as well as thoughtful. Joe is one of the few relickers out there that seems to understand that old guitars started out glossy, which is one reason his finishes look so authentic.

Once the guitar came back from Joe’s, I knew that such an attractive guitar would need an equally alluring pickguard as the original wasn’t fit for my purposes. For this, I turned to Mark of Spitfire Tortoiseshell Pickguards.

For the uninitiated, Spitfire Tortoiseshell Pickguards is the most respected purveyor of vintage-style shell. Whereas many of the available shell guards on the market lack the depth and character of the original Fender celluloid guards, Mark has approached the task of recreating that swirly handsomeness as a true craftsman.

Each bespoke piece is handcrafted using a number of made-to-order options to narrow down color and degree of aging suitable to match the customer’s instrument. And even better, Mark is a pleasant sort of fellow who puts up with endless questions with an ironclad resolve. Believe you me, I tested this extensively. When you speak with him, you get the sense that he really wants you to love his work because he loves his work.

It’s Good to Have Options

When you order, the form will run you through all of the possible selections, from color to style, to the various types of relicking available. There are four basic colors––Faded Orange, Bright Red, Vintage Burgundy, and Vintage Dark––as well as a range of different pattern types; “Subtle” is a very gentle gradation from orange to red, appearing almost solid from a distance; “Speckled” is what you’d expect from most early tort guards, with more distinct patterns; “Crazy” has very pronounced, sometimes jagged bursts of color; “Solar Flare” is for the more adventurous, making a bold, brash visual statement that’s worthy of the churning, molten nature of our solar system’s bright center.

“Condition” allows you to choose the degree to which the guard is artificially aged, from new to Extra Heavy. New guards will, obviously, look brand new while the relic process becomes more drastic from there. Extra Light guards will have the patina of a closet-kept example, while Heavy will resemble a guard that’s seen thousands of nicotine-soaked bar gigs and relinquished its glossy shine long ago. If you want the premier vintage experience, you can even have them pre-warped!

In addition to those options, you’ll also see the price breakdown for pickguards, ranging from a modest $50 for white, $75 for mint, and all the way up to $230 for relic tort guards. Let’s be real: It’s true that $200 for a pickguard will seem steep to many of you reading this, and I fully understand. Like many of the toys we guitarists employ, a Spitfire pickguard is a luxury item, so if you’re unconcerned by vintage-correct looks and a 30-degree bevel, then there are plenty of other options out there.

However, I think the price point justifies itself relatively easily. For the sake of perspective, actual vintage Fender pickguards routinely sell for $300 and higher, so choosing a Spitfire guard––made to your specs and without the threat of shrinkage––makes good sense when you’re in the market. Surely, there are other options for custom guards, but none of them offer the level of detail or control over the look of the thing, only how it’s cut. The attractive nature of Spitfire’s work and the number of available colors makes it well worth the asking price.

I Went With A Burgundy

I can hardly believe it’s the same guitar

Clicking submit sends your order off to Mark, who will follow up to let you know he’s received it. Ask him some pressing questions if need be, lay down the $50 deposit, and you’re set! If it all seems a bit overwhelming, bear in mind that you’re not just picking something off of the shelf, you’re ordering unique kit custom-tailored specifically for your guitar, and this will help Mark match it perfectly.

Over the years I’ve had the pleasure of installing a few Spitfire guards, so I knew the fiery nature of Mark’s work well. Fit and finish is normally excellent, and once installed the Spitfire guard lends a certain allure to the instrument. When compared with modern tort, especially that found on new production instruments, the difference is staggering.

I ordered a Vintage Burgundy guard in the Speckled ‘60s variety, lightly aged. The time between ordering my guard and receiving it was about two weeks, which isn’t bad at all. When it finally arrived, I was floored by how vivid and bold the pattern looked in person. Deep reds and browns as well as orange-yellows were present, and the swirl was particularly lovely. I especially like how the colors seem to dance like flame in direct sunlight.

I took an immediate liking to the guard as well as the new “Thin Line” material, with white-black-white layering which more accurately replicates the sandwiched materials of vintage 1960s pickguards. The aging was also tasteful and not at all overblown like one might expect in this era of torched and mutilated custom guitars. The shine was dulled a bit, but not completely eradicated, and the edges were given a touch of a brownish-yellow hue to tone down the bright white of freshly-cut plastic.

Detail of Spitfire’s lightly-aged edge


The general fit of the guard to my 1963 Jaguar body was snug as far as the outer perimeter is concerned, better than most other aftermarket guards, too. The lines of the pickguard mated cleanly with those of the Jaguar’s various control plates, a characteristic fault of aftermarket Jaguar guards. It may be true that they’re a tougher guitar to get right––what, with all of the control plates––but Mark’s made short work of it. A couple of the screw locations didn’t line up perfectly, particularly in the treble-side cutaway. This didn’t totally surprise me, given that it’s a vintage guitar and I believe Mark uses an AV65 template. In any case, they aren’t so off that I won’t be able to mount it, but concerned parties should know that sending a tracing isn’t out of the question.

In the interest of being Fair and Balanced (remember that?) I suppose my one critique would be with the images presented on the Spitfire website. There’s a lack of consistency in lighting and quality throughout the Gallery section, where the mix of sunlit and indoor photos can lead to some confusion between the four basic tort varieties, particularly with the very different Bright Red and Burgundy where many shots imply some overlap. (see below)

Different but close: Bright Red (top) and Vintage Burgundy (bottom) from Spitfire’s website

Of course, these are mainly comprised of images from happy customers, which is surely a fine thing––and so many of them, too! I think even a single well-lit professional studio shot of the four styles placed together would do the trick, something that gives potential customers a better idea of what they should expect when ordering.

Twas a Very Good Year

Spitfire on top, 1961 on bottom

So, how does Spitfire hold up when compared with original 1960s tort? Beautifully! It’s definitely in the same arena as vintage tort, although it does have its own distinctive look. That’s not to say it’s inferior by any stretch, but it’s difficult to quantify until you’ve seen them both side-by-side. Here’s a shot of the Spitfire next to the original guard on on Pancake, my 1961 Jazzmaster.

For lack of a better descriptor, I’d say the Spitfire is more ‘in focus’ if that makes any sense; the Fender piece has a sort of burred smoothness to its pattern whereas the Spitfire has cleaner, more defined edges to its colors. There’s also a tightness to the grouping of colors here, with yellows most prevalent in the middle of the guard, with browns and dark reds surrounding. The ’61 material more or less stays uniform throughout.

This, however, is the strength of the Spitfire: It’s a one-of-a-kind work of art, like a thumbprint for your guitar. With Spitfire, you’re guaranteed to receive something that no one else will have, something meant to enhance the visual essence of your instrument. Instead of simply rehashing the techniques of old, Spitfire’s taken them a step further. The results? Gorgeous.

Check out Spitfire and start your order HERE. Now to find time to finish this Jaguar.


Tagged , , , , , , , , , , , , , , , , ,

Squier-O-Practor: A Misaligned Neck Could be Painful

When you think of a decent guitar setup, what comes to mind? Lowering action, correcting intonation, maybe giving the truss rod a good turn? They’re all components of a good setup for sure, but is that really the long and short of it? No, there’s more to it than that!

I’ve always believed that a thorough setup has to go beyond just the basics. You’ve got to take into account the whole instrument, from dressing the nut slots for the player’s preferred string gauge to even giving the tuners a quick twist just to make sure they aren’t sticking. De-gunking a fretboard, polishing frets, spraying out dirty pots, and even removing some problematic rust are often essential to making a guitar fully playable as well as functional.

Case in point, something I’ve often seen slip past the sensors is neck alignment, where the neck is tilted on the body in favor of one E string or the other. With a misaligned neck, the strings closest to the edge of the board are prone to slipping off and intonation can suffer greatly. Almost every bolt-on guitar on the market exhibits this issue in some form or another, which is commonly caused by the extra bit of play in the neck pocket that comes with mass-production. It’s an issue found on high-dollar guitars too, not just imports and affordable models like the guitar I’ll use below as an example.

Have a look at this Squier J.Mascis:

Misalignment on the left, corrected on the right

When I got my hands on this one, the high E had a tendency to slip off the fret ends, and intonation on the plain strings was nearly impossible, especially with the reduced saddle travel of the TOM bridge installed on the model. This kind of thing can even muck with string bending, as the string can be choked off as it crosses the fretboard at an angle. Also note that the strings do not line up with the pole pieces of the neck pickup!

Luckily, this is an easy thing to correct. The most basic solution is to simply pull the neck back into place. In this case, all that was needed was holding the guitar with the upper bout against my body and giving the neck a quick pull towards me, then tightening the neck bolts to ensure it stays put.

Fig. 1

In more extreme cases, shimming around the perimeter of the neck pocket may be necessary for a tight fit. Where there’s only a little extra space, I’ll insert a shim where the neck touches the pocket when tilted. Using this J.Mascis as an example, this could mean shimming the treble side of the heel and along the bass side of the pocket to keep it in place. [See Fig. 1]

As for materials, wood veneer, cut-up baseball cards, or even discarded picks made to fit will work just fine if you’re more of a DIY fan. In the case of an oversized neck pocket, like those often found on some CBS Fender guitars, a qualified tech or luthier should be able to add material if necessary, even going so far as to add a shaped, painted shim along the bass side of the neck. Really, whatever keeps things stable is good enough in most cases.

Next time you’re cleaning or restringing your guitar, have a look at the neck and check to make sure it is properly aligned. If not, you could be missing out on a better setup and truer intonation as a result. All it takes is a little attention and experimentation to correct an issue like this one.

Tagged , , , , , , , , , , , , , , ,

The Buzz Stop Stops Here: A Rant

Hate is a strong word, and one I normally don’t like to use unless the subject is foods called “salad” which do not contain lettuce (the only exception being Fruit Salad, but why call it that when ‘Cup of Fruit’ would suffice). While I can’t call my feelings for the Buzz Stop ‘pure hatred,’ I have to admit that removing them from guitars is one of my favorite jobs.
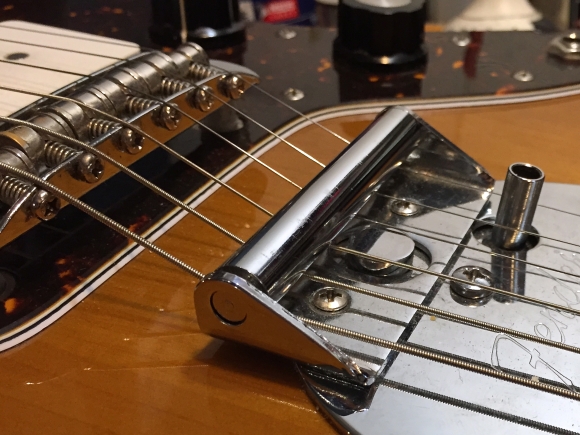
For the uninitiated, the Buzz Stop is an aftermarket bracket for Fender Jazzmasters and Jaguars which acts as a tension bar, much like the roller bar on a Bigsby B7 vibrato. Affixed to the guitar via the forward-facing vibrato mounting screws, the Buzz Stop forces the strings against the bridge, keeping the them in place while also stopping the saddles from buzzing. Hence the name; it stops the buzz.

In theory it’s a fine idea that attempts to solve the problems so many have with the original Fender design, but it’s ultimately completely unnecessary and in many ways a detriment to your guitar’s sound and functionality. Below, you’ll find the reasons I elect to do away with the Buzz Stop, and why I find guitars without them to be better instruments for it.

1) The Buzz Stop Introduces New Points of Contact

The whole point of the Buzz Stop is to force the strings down, and in doing so invariably creates additional points of friction. The Buzz Stop’s roller bar is one of those points, and while it is intended to rotate as the vibrato arm is depressed, I’ve never encountered one that actually does so in a smooth manner. Most seem to require a bit of force to turn, more than the strings can dish out. As a result, many of the Stops I’ve removed have had grooves worn in them, which means the strings are just grinding against an immobile roller.

The second point of contact is the back of the bridge itself, a problem that Jazzmasters and Jaguars shouldn’t have to begin with. Under normal circumstances the strings flow from vibrato to bridge uninhibited; the sharp angle of the Buzz Stop causes them to dig into the back edge of the bridge, leading to tuning or even breakage issues. The less metal in the string’s path, the better.

2) Buzz Stops Decrease the Stability of the Vibrato

With its nearly unparalleled stability and smooth feel, the offset vibrato really is one of the biggest selling points of the Jazzmaster and Jaguar. But with the increased friction of a Buzz Stop, it’s a miracle when the thing returns to pitch. Anything that messes with the functionality of the vibrato is a liability, not an asset.

3) It Forces the E Strings onto the Dreaded Pivot Plate Screws

The vibrato pivot plate mounting screws which sit directly beneath the two E strings have long been a problem on reissue guitars, causing string breaks and tuning issues which can normally be cured with a proper setup and increased bridge height, or by simply turning them upside down as shown in one of the early Demystifying articles.

With a Buzz Stop installed, there simply is no hope for the strings (See above). Pulled down toward the vibrato plate, the Es are forced against those pesky domed screws. As they’re bent, tuned, or warbled with the vibrato, the screws eventually saw through the string’s finish wrap leading to sharp detuning, and eventually, breakage.

4) The Buzz Stop Alters the Guitar’s Unique Vibe

Part of the unique sound of Jaguars and Jazzmasters is the length of string behind the bridge. Like an archtop acoustic, every bit of vibration counts. There’s a fullness and a pluckiness to the tone that comes from the added string length, and the slight decrease in sustain and tension makes these guitars feel and respond unlike other solidbody electrics. It should be no surprise that I also wholly endorse vigorous picking behind the bridge for atonal, noisy fun.

With a Buzz Stop installed, you may as well have a stop tail. It effectively cancels out the length of string behind the bridge, sterilizing some of the three-dimensional resonance that make these guitars sing. And honestly, if you’re looking for more sustain or ‘better tone’ there are far better options available to you in the form of Mastery and Staytrem hardware.

5) It’s a Half Measure Response

The Buzz Stop is a product of a time when these guitars were thought of as toys rather than fully-playable instruments. Without the readily-available, conversational sources for setup and modification that we have today (including this blog and my recent Premier Guitar article) the Buzz Stop was perhaps a once-legitimate option for taming this misunderstood, often neglected offset design. Though its premise was flawed, it served its purpose.

The Buzz Stop, by its very nature, doesn’t really “fix” anything; it’s a stopgap which fails to address core issues, applying force instead of correcting an inadequate setup. All of the common complaints, from bridge buzz and string jumping, tuning stability, and unwanted string resonance are easily solved with an attentive eye, a couple of screwdrivers, and a few hex keys. Neck angle, bridge height, string gauge––all of these things are integral to the design of the guitar, some of which the Buzz Stop website actively recommends against.

With advent of the internet, players now know how to care for the Jazzmaster and Jaguar better than they ever have. Communities like Offset Guitar Forum and Shortscale.org popped up and thrived, surrounding the Jazzmaster and Jaguar with that perfect, geeky love that reminiscent of my fellow Star Trek fans, excitedly swapping tips and parts, digging into manuals and other documents to discover the proper way to work on them.

6) It’s Ugly

It is. Don’t @ me.

The Long Walk into the Sunset

Call me a pedant, call me a purist, even call me ol’ Henry’s favorite, “luddite”––I just think we have so many better options for modifying or ‘fixing’ these instruments, all of which leave the original sound and intent largely intact. And honestly, in every instance where I’ve removed a Buzz Stop and then properly set up the guitar, it just sounds better to me.

We used to joke at the old shop about a cardboard box tucked away in the back that was filled with forty discarded Buzz Stops. We’d always say “forty” for some reason––We have forty of them in a box!––but thinking back that number has to be low. Literally every time we took in a new Jaguar or Jazzmaster bearing one, off it would come, fate sealed, tossed with prejudice into said box never to be seen or thought of again. And that’s just the way we like it.

Tagged , , , , , , , , , , , , , , , , , , , , , , ,

Demystifying Part 5: The Fender Mute

After a years-long hiatus, the Demystifying series is back!

First, I need to say thanks to all of you that have checked out the blog, and in particular the many that have shared and reposted these articles. Because of their popularity, Premier Guitar recently asked me to write an offset guitar setup guide for publication, which you can find in the May 2017 issue. AVAILABLE NOW IN STORES AND ONLINE!

So thanks to all of our readers, customers, and friends––without your support, this never would have happened.
The one bit of hardware I’ve not discussed previously is often thought of as a vestigial, an hold-over from a different time fit for the bin. Ultimately, it’s up to you if you’re ever going to use the thing, and to be honest, it seems like many don’t. However, if you’ve ever been curious about it, or if you use it but find it problematic, then friend, I come bearing glad tidings. I am of course talking about the Fender Mute.

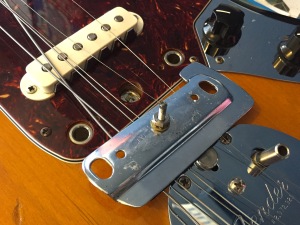
A feature shared by both the Jaguar and Bass VI – though not across all models or years of production – this curious metal plate was originally intended to be a surrogate for palm muting. Couldn’t be a simpler mechanism, really: the mute is secured to the body by two screws, and the long bolt in the middle pivots on a spring-loaded plunger sunk into the guitar body. The mute can be engaged by pressing on the plate, shifting it back and forth in place, causing the foam pad to make contact with the underside of the strings.

The Fender Mute leaves the player’s picking hand totally free for strumming or sustain-less leads. This gives the device a sound distinct from traditional palm muting techniques, one widely used on instrumental surf recordings of the 1960s. What’s it sound like? I just happen to have an example for you here:

Like the Fender offset bridge, the mute requires some extra thought to set up correctly. Really, the whole procedure comes down to balance; the mute has to be set to engage smoothly while allowing the bridge to be lowered enough for playable action. If the mute sits too high, the bridge will rest on its mounting screws. Too low, and the mute won’t engage at all.

It’s best to begin with the mute installed on its own––leave the bridge for later. Remember those two mounting screws I mentioned earlier? You’ll need to find the lowest possible setting for them where the mute still pivots. Try screwing them in all the way, then backing off until the foam side of the mute pops up and stays put. Then, install the bridge and make sure it doesn’t sit on top of the mute mounting screws.

It may take a few tries, but you’ll soon find that balance. When pressing on the plate, the foam side should rise up to meet the strings but not push them up, then stay firmly in place. Pushing down on that side should disengage the mute, again with a firm action. If the mute doesn’t stay in place, or is difficult to move, take the bridge off and keep adjusting those mounting screws.

Top: disengaged. Bottom: engaged

It’s worth noting that, In order to get the mute set up correctly, your guitar will need to be shimmed as described in part two of the Demystifying series. A sufficient amount of neck angle is crucial, otherwise there may not be enough room under the bridge for the mute to be functional.

One problem that can crop up with the mute is that it pulls the strings sharp when it’s engaged. Often, this can be due to the mute sitting too high, which effectively shortens the scale length of the instrument. If that’s the case, cranking down the mounting screws should solve this issue for most players. Too-hard foam can also be the culprit, pushing up on the strings and raising pitch. Substituting a softer piece of foam here can work wonders (more on that later). Alternatively, one can easily shave off the bit of foam that touches the strings.

If you have a vintage Jaguar or Bass VI, you’re likely familiar with a problem that arises when the original foam on vintage instruments, due to age or contact with sweat: deterioration. This happens to pickup foam as well, where it hardens and compresses, rendering pickup height adjustment difficult or even impossible.

Hardened, sticky mute foam on a refinished ’63 Jaguar. You can see the gooey residue on the low E side of the mute.

If this happens to your mute foam, I have to tell you there’s no point in trying to salvage it. Touching or removing the stuff, you’ll notice that what was once foam is now a slightly gooey, sticky mess. Even on a totally original ‘60s guitar, leaving foam in this state is at the very least off-putting and potentially problematic, what with the black residue left behind on contact with skin or strings. Seriously, that stuff is disgusting.

Do yourself a favor and replace that foam. I’ll admit, it’s often the only part we’d even thing of replacing on a perfect vintage Jaguar. Replacement Fender foam can be found on eBay, but it seems that every parts supplier is out of stock right now. In a pinch, we use this. The link will take you to some weather stripping foam that’s just slightly taller than the 3/8” by 1/4” Jaguars have from the factory, but it should work like a charm. If the extra height concerns you, the same brand has a version with a height of 3/16″ as well.

Interestingly, this Mute wasn’t Fender’s first shot at string-dampening technology. Earlier, there was foam stuffed under the bridge covers of ‘50s Precision basses. The first Jazz Basses featured stiff pads for each individual string, while the later Mustang Bass  bridge had similar devices. Muting may make a bit more sense on bass than guitar, but give this mute system a shot and see if you can’t make it work for your brand of music. To the author, it’s a fun sound that makes some rhythm parts more interesting, and with effects added, it can bloom into something totally unique. And weird. Definitely weird.

Tagged , , , , , , , , , , , , , ,

The Taming of the Shrill: How to Rein in the Extra Brightness of an Offset Guitar

Whether it’s fawning over custom colored Jags or addressing some playability problem on a Jazzmaster, it’s safe to say we talk a lot about offset Fender guitars. It’s been an honor to help guitarists understand the quirks associated with them, yet one such quirk we’ve not addressed previously is the tonal range of these guitars.

While it’s true that both the Jaguar and Jazzmaster are capable of some truly bright trebles, they’re also capable of some deep, complex low end. Newcomers to the sound often home in on that brightness and fear that they’ve bought a guitar they can’t use. If that’s you then I’m here to help.

In no particular order, here’s a short list of ideas to help you tame the shrill from your offset Fender guitar. But before we dig in, I’d like to note that guitars being the sum of their parts, the suggestions I’m about to make likely won’t offer a night-and-day change in the sound of your guitar. To put a numerical value to it, you may find that they only amount to a 5% difference, but that could be the 5% you need.

This list may be offset-centric, but these suggestions can apply to just about any guitar.


Examine Your Amp Settings

We guitar players can be rather superstitious. Once we find that sound in our heads, once we settle on those ‘magic’ numbers, it seems like sacrilege to deviate. If this is you, take a deep breath and get centered because the very first suggestion I have for those afflicted by harsh treble frequencies is to simply dial them out.

For symptoms of excessive brightness my prescription is to start with the Presence, assuming your amp has this control. Presence knobs govern the very top of the top end (around 3-7khz-7khz) and as such turning down this knob can have a dramatic effect on undesirable ice-pick frequencies.

Treble controls most often govern the more tuneful highs in of a guitar signal (typically 1.5khz-4khz) so you may find that pruning too much here kills some pleasantness. Still, with the ample treble produced by Jazzmasters and Jaguars, you may find that you won’t need as much to keep things defined.

Now, your instinct may be to roll up the Bass knob and that may certainly help a thinned-out guitar, but be careful not to use this as a catch-all solution. Guitars generally live in the upper EQ bands of a mix, and while punishing low end sounds (and feels) great on its own, you also run the risk of muddying up a full band sound by boosting bass too much. Remember to leave space for other instruments.

You can also try utilizing the tone controls of drive pedals in the same way, cutting highs before you hit the amp. Using a darker pedal or settings before a bright amp can yield some lovely tones, or if you’re the kind that likes bright cleans and dense overdrive, this may be the way to go.


Roll Off that Tone

 Knob

I think a lot of folks have been emotionally scarred by the cheap electronics of affordable instruments, but there’s really no reason to fear the humble variable low-pass filter. Sure, a bad tone control can do sickening things to the sound of a beloved instrument; a good one can be an effective secret weapon.

I’ve long maintained that the stock Jazzmaster tone control is one of the most usable ones around. The combination of the 1meg linear potentiometer and a 333 capacitor just seems to dial out the exact high end frequencies that my ears find so unpalatable without sacrificing clarity.

It may help if you think of your tone control as a taste control instead; depending on your musical situation, you can really change the flavor of your guitar’s response to fit the moment. On my personal Jazzmasters, I leave the Tone knob at 6 or 7 as my basic sound and if I need a thicker sound, backing off to 4 or 5 does the trick. If I need twang, rolling up to 10 is almost like picking up a really good Telecaster. I’ve even gone so far as to install Gibson-style pointers on my Thin Skin Jazzmaster so that I can take note of exact settings.

When used in tandem with some smart amp-based EQ whittling, these first two suggestions may be all the only bits of the list you’ll ever need.

Try New Strings

Most people can throw down $5-$7 on a set of strings once in a while, and if you’re feeling blue about your tone, changing up your string brand or gauge is one of the most effective tweaks you can make.

Every brand has their own feel and sound, so it’s worth experimenting a bit. Say you’re a devotee of nickel plated strings but you’re getting a little too much zing. Try a set of pure nickel strings next time around, which tend to be warmer. If 10s lack some low end thump, try stepping up a gauge. Flats, ground-round, coated and uncoated, different metals… There’s a whole world of options out there. Go nuts.

Swap Pots

A common mod you’ll hear about from Jazzmaster owners in particular is tossing the stock 1meg volume and tone pots out for a lower value. Doing so warms up your guitar’s sound by shaving off a bit of the volume and high end response.

When I’m explaining the basics of how pots work to a customer, I liken them to the flood gate of a dam. If the gate’s wide open, it lets all of the water through, while closing the gate permits only a trickle. The value of potentiometers does something similar.

A pickup wired straight to the output jack is what I’d call ‘wide open’ – the full signal coming from your pickup is going to the amp without restriction. When you introduce a volume pot you’re limiting how ‘open’ that gate can be. A 1meg pot is pretty close to wide open, letting a lot more signal pass than 500k, and 500k passes more than 250k. It’s because of this that we often pair certain pot values with different types of pickups (i.e. 250k for singles and 500k for humbuckers).

The stock value for your Jazzmaster or Jaguar is 1meg, which has much to do with the bright tone of these guitars. When you swap out for a lower pot value, you’re shifting the resonant peak frequency lower, invoking a warmer sound. Stepping down to 500K is enough of a change for many players, but going all the way to 250 shaves off an even greater amount of high end.

For an example of what lower pot values can do for you, Nels Cline’s famous “Watt” Jazzmaster has 250k pots, which works perfectly for a man known for hating treble.

My signature Redbeard cable from our pals at Sinasoid, available through Mike & Mike’s!

Ditch the Lossless Cables

While the arguments surrounding the effect of cables on tone are never-ending, it makes perfect sense that anything between your guitar and amp could alter your tone. And while many cable companies boast ultra-low capacitance, conductors made from rare materials, or instrument-specific lines, many of the most influential musicians of the last 50 years used whatever they could find to make that all-important connection.

Hendrix’ use of long, coiled cables is one of the examples many point to when citing how a cable can have a huge impact on the sound of a guitar. Coiled cables by nature are actually much, much longer than similar standard cables––there’s almost three times the material between the plugs! As a result, the signal from the guitar has to travel a much longer distance to reach its destination, and thus, increased capacitance. The greater the capacitance, the less high end that is transmitted through the cable.

Capacitance is no joke and is something worth considering when you buy a cable. That said, ultra-low capacitance may not be the best choice for everyone. When our pals at Sinasoid offered to design signature cables for the shop, I specifically asked for a longer, higher capacitance cable than what I was used to, and I couldn’t be happier. So ditch the buffer and short leads and see what happens.


Swap Pickups

A lot of players ask me for recommendations on darker Jazzmaster pickups, and usually the first four names out of my mouth are Lollar, Novak, Antiquity, and At-The-Creamery. Each of these manufacturers offer superior sound to most stock units and have tons of options even for Jaguars.

For those looking for vintage-correct tones, Duncan’s Antiquity Is beautifully capture the sound of a 60-year-old black-bobbin pickup, louder and darker than the IIs which emulate the brighter grey-bobbin pickups of the late 1960s. Comparing the Antiquity Is to the pickups in my ’61 Jazzmaster, they’re damn close. Of course, Duncan has many different Jazzmaster pickups.

Lollar’s standard Jazzmaster set is a lot like a 60-year-old pickup when it was brand new: healthy output with a bit more top end, as well as the signature Lollar midrange bump. I have these installed in my 2007 Thin Skin Jazzmaster and couldn’t be happier. Lollar also offer one hell of a Jazzmaster-sized P90.

If you need something weird, my friend Curtis Novak is my first choice. Curtis has a knack for stuffing non-standard pickup designs under a stock Jazzmaster cover, from Mosrite and Gold Foils to dummy-pole humbuckers. He’s a miracle worker.

Jaime from At-The-Creamery in the UK is a fantastic option for those who like to get into the nitty gritty details of pickup making, allowing the player to choose things like magnet type and output. He does brilliant work to boot.

Of course, each of these makers offer a wide range of pickups for all guitars.

Have you tried plugging into the Bass channel?

Try Darker Amps

With the popularity of the boutique amp market and its affinity for “jangle” it’s bit more difficult to find amps with a focus on low end and low-mids rather than trebles. I realize that not everyone can just get a different amp at the drop of a hat – I’m no spendthrift either – but if you find yourself in a position to consider a new or additional amp, then I have a few suggestions for you.

For smaller tube amps, the Fender Blues Jr. Lacquered Tweed is equipped with a 50 watt Jensen speaker, which offers less speaker breakup and a lot more low end than you might expect from such a small cabinet. I also highly recommend the Excelsior Pro, made in the tradition of 1950s low-wattage combo amps and reviled by some for its tonal inflexibility. Still, that 15” speaker sounds huge even at modest volumes and the amp loves pedals. They go for next to nothing on the used market.

For a mid-size amp, the Peavey Classic series tends to be overlooked but you’ll find warmth characteristic of Tweed-era Fenders at a fraction of the cost. For UK tones, the Normal channel of an AC30 works beautifully, but if you’re looking for something with more gain the Orange Rockerverb range should do nicely.

For heads, I have to say that the new Marshall Silver Jubilee reissue surprised me with the amount of lows it has on tap. The Mesa Tremoverb is another hugely underrated and darker-sounding amp, one higher-gain head that I wish I owned.

Come to the Dark Side

I’d like to echo the sentiments of our Sith Lord Vader, welcoming you to the more sinister side of tone. To be clear: there’s absolutely nothing wrong with brighter sounds! If chime is your thing, chase your bliss! Me, I’ll be over on the other side of the stage in my warm, woolen cocoon.

Tagged , , , , , , , , , , , , , , , , ,

REVIEW: Toothsome Tones from Yellowcake’s Furry Burrito

I’m a big fan of cake, let it be known far and wide. All kinds of cake, really: carrot cake, coffee cake, Devil’s Food, German Chocolate, the band Cake, ice cream cake, and especially Red Velvet, which seems to get a lot of hate and is often erroneously thought of as “just chocolate cake that is red.” This is a guitar blog, but I’m tempted to spend the rest of this article explaining exactly why that’s so, so wrong. It’s offensive, really.

For whatever reason, I’ve been in a yellow cake phase for well over a year. I mean, with so many flavors out there, why settle for boring old yellow? There’s just something about that buttery-sweet taste that’s arrested my tastebuds, I really can’t explain it. Except now that I think of it, this craving coincides with the arrival of one of the coolest pedals I’ve ever owned, one which has cemented its place in every incarnation of my guitar and bass rigs since: The Yellowcake Furry Burrito.

Maybe there’s a connection.

img_1827

All-Purpose Fuzz

The Yellowcake Furry Burrito is a fuzz pedal, but not just––the fuzz circuit cascades into an on-board overdrive, reminiscent of the old practice of “stacking” gain stages for maximum saturation, only here it’s in a single unit. In this way the Furry Burrito offers uniquely full-bodied sounds, mating a buttercream Muff-like fuzz and the midrange and clarity of a good overdrive. Even at its most boisterous settings, this pedal never loses definition and potency.

Four knobs adorn the pedal’s pastel enclosure: Gain, Drive, Filter, and Level. Gain and Drive control the amount of fuzz and drive, respectively. Taking turns with each knob shows off the pedal’s unique versatility: favoring the Drive knob gives way to the sweeter side of the Burrito, but Gain is where the decadent fuzz circuit resides. Mixing the two offers a near-endless variety of tones that blur the lines between the two famous effects.

The control labeled “Filter” is your basic variable low-pass which governs the amount of treble frequencies present. However, even at its most extreme settings the pedal retains its personality, never sounding too crystalline or mushy. If you prefer your amps dark like me, you’ll find that the Filter knob can act as a sort of fixer where other fuzz pedals may become too gummy. 

The FAT switch, as you might have guessed, is a two-position selector that offers a boost to the bottom. The ‘down’ position is the pedal’s vanilla setting, and while it’s certainly thinned out compared with the alternative choice, it is by no means washed out or icy. Engaging the switch caramelizes the low end into monstrous bass sounds and warm leads. This pedal loves low frequencies.

The real surprise here is the LED indicator, which doubles as a voltage trim pot. This lets you starve the circuit, introducing all of the sputtery, ripping goodness we all so enjoy in a good fuzz. This, combined with the two flavors of grit, makes the pedal singularly versatile.

Suggested Recipes

At its most polite settings this pedal won’t get you to clean boost territory. What you’re far more likely to find here is a robust drive with some RAT-like edge. What it lacks in subtlety, it more than makes up for in bold sounds as rendered here in my very first encounter with the pedal some sixty-six weeks prior to this post:

These Pinkerton-esque sounds were produced with Drive and Gain both set right around the mid-point into my Fender Excelsior Pro. With my old Jazzmaster, I was surprised by the nearly authentic “The Good Life” sounds that were coming out of it. You know me, all of my gear-tasting begins and ends with Weezer tunes.

The Furry Burrito positively blooms where more chaotic sounds are concerned. Rolling up the Gain and Drive knobs, the pedal becomes a sumptuous wall of thick fuzz, especially with the FAT switch in the ‘up’ position. The ample, peanut butter thick low end fluffs the signal without over overstepping the bounds of good taste (unless you wanted it to). Think Smashing Pumpkins and Dinosaur Jr.

It was this side of the Furry Burrito’s flavor profile that inspired my cover of “Silent Night,” which I recorded early in December of 2016. I ran the Yellowcake into a Strymon Bluesky set for a large hall verb, then ran the stereo signal to my ’65 Fender Bassman piggyback on one side and my ’79 Marshall JMP and mock 8×10” (4×12”) cabinet on the other. When the dirt kicks in at 57 seconds, what you’re hearing is the Yellowcake pedal, those amps, and my old Jazzmaster. I’m really proud of that sound. Have a listen:


Perfect Pairing

It’s also worth mentioning that the Furry Burrito pairs beautifully with other pedals.  When introduced in front of my old standard, the Smallsound/Bigsound FUCK Overdrive, the cascading effect of the creamy fuzz slamming into the FUCK, which added some sweetness and depth while the Furry Burrito happily drenched it in a gooey  ganache of fuzz. When used after my Z.Vex Fuzz Factory, I ended up with an even bigger, wider array of squishier tones. The pairing of the Factory and the Burrito also proved useful for added chaos at the very end of “Silent Night.” You can hear them together at the 1:46 mark, when I go behind the bridge for for the big finish.

This pedal is one of the rare few that’s as at-home on bass as with a guitar, especially with the voltage trimmer rolled back a bit. It also totally nails some of my favorite bass fuzz tones, including Beastie Boys‘ “Sabotage.”

Cooling Rack

img_5394

The Furry Burrito fits in perfectly with Kali’s color-coordinated rig

Having owned this pedal for so long, I should be able to tell you all about its strengths and its weaknesses, but it’s shockingly difficult to come up with criticism.

Yesterday, I showed the pedal off to my good friend Kali Kazoo, one of LA’s most unique and colorful songwriters. Touring the pedal’s various features and settings with Kali, I realized that the LED trimmer, while novel, is easily overlooked. There’s no visual “TURN ME” cue as you’d might expect, no overt declaration of its function. Being a clear, back-lit knob, I also wish for a contrasting indicator so settings are easier to recall. As it stands, my favorite setting for the trimmer is “turned to one side and then back a little bit.

Surely it’s not an exact measurement, but I often adjust according to taste anyway. As far as complaints go, that’s Angel’s Food. Cake jokes.

Have Your Yellowcake and Eat It Too

At $165 street, this pedal is a steal. If you’re on the market for a good, versatile fuzz that can do a lot more than just big, meaty sounds and keeps its composure, definitely keep this pedal in mind. If you find other popular fuzzes too capricious, the Furry Burrito would be an excellent option for you as well. Me, I can’t even think of leaving this pedal off of my board.  You know, I’m glad I don’t have to.

My board from the most recent LeoLeo tour.

My board from the most recent LeoLeo tour.

Tagged , , , , , , , , , , , , , , , , , ,

Shelton Electric: A Very Special Valentine’s Review

img_1870Valentines Day came and went this week, a day filled with heart emoji, chocolates and stomach-turning cuteness from couples telling the stories of how they met. Love at first sight gets a lot of play in tales of romance, but it is most definitely a thing with musicians as well. It can even lead to trouble sometimes.

You’ve heard the stories of chance encounters and missed connections, I’m sure:

“I walked into the store, and there it was, just hanging on that wall. I had to make it mine.”

“Begged my friend to sell it to me for three years, and then one day he asked me if I still wanted it. I went to the bank right then and there!”

“I came back later that day with the money and it was gone! Wish I would have put it on layaway.”

For this piece, I want to tell you how Shelton Electric Instruments turned the longing gaze of this furtive lover into a two-week whirlwind romance with the GalaxyFlite model. Like the flickering light of a candle, our passion danced and then suffocated quickly, leaving behind only wisps of smoke and memories that won’t soon fade.

I Swiped Right on the Flite

img_1886The first time I saw Shelton Breeden’s work, I was intrigued. Shelton Electric Instruments offers up instruments based on familiar shapes but with a few modern twists that set them apart from a room filled with suitors. Such twists range from back-painted pickguards and racing stripe finishes, to electronic tweaks and non-standard pickup configurations. From the photos posted on Instagram, Shelton’s manifest commitment to quality shined in a frankly oversaturated social media landscape. I was hooked.

I skulked about on the app for some time, liking and commenting away but careful never to draw too much attention to myself. Just an admirer, this fellow. To my surprise, a direct message from Shelton soon appeared in my inbox, asking if I’d like to give some of his guitars a thorough once-over and offer some suggestions. I accepted without hesitation; any builder that wants to send me gear so I can blab about it on the internet knows how to push all of my buttons.

Red Dress and a Pearl Neck…lace

This case really gets the imagination going.

This case really gets the imagination going.

Quick to arrive at my door was this GalaxyFlite Super III model, which uses the classic offset shape as a basis for customization. Opening the very classy-looking case, that familiar candy smell of new finish rose from it and greeted me like a handshake. Immediately apparent is Shelton’s eye for detail, the nitro finish being flawless in both hue and sheen. Fiesta Red is one of those colors that just exudes cool, and Shelton certainly nailed the shade, rich and alluring as it should be. A bound-and-blocked rosewood fretboard was perfectly accessorized to the ensemble.

Speaking of visuals, let’s talk about that two-tone headstock. Some folks don’t seem to be on board with it, and I understand that it’s a deviation from the norm. Beauty is, as they say, in the eye of the beholder, yet this beholder loves it. It would seem that many builders prefer to stay in the well-tread peghead wheelhouse and only slightly tweak the shape so it’s not legally actionable. Instead, Shelton went for a design that’s half plank and half aircraft nose, evoking the image of a scimitar slicing through the air. Is it a success as unique and identifiable designs go? I’d say so. For those with less adventurous tastes, a new, sleeker version is already on its way.

img_1936Though the neck shares the 1 11/16” nut width of Fender reissues, Shelton’s shape is slightly more substantial than what you’d find on AVRI 62 models. The more modern 9.5” radius felt as comfortable as it did familiar, so players used to flatter or rounder necks should find something to love here.

The fretwork on this Galaxy Flite is perhaps the best I’ve seen on any custom instrument, and I’m not just being kind here – this work is superior to my own. Notes ring out clear in all positions, fret ends are meticulously sculpted, and the crowns are so perfectly rounded that you barely register them whilst sliding your hand up the neck. All of this is thanks to Rachel Quinn, who handles final setup duties for the company.

I Used “Pickup Lines” in a Previous Article So I Can’t Here

img_2023Equipped as standard are a few of my favorite brands, namely Mastery Bridge hardware, Porter pickups, and Emerson Custom electronics. Using such high-quality components means these instruments are guaranteed be fully functional and dependable right out of the box. Aside from matters of taste, there won’t be any need for round after round of upgrades here, setting Shelton apart from the few high-end builders that use cheap hardware and electronics.

Three Porter Jazzmaster-style pickups occupy a swimming pool body rout, a modern-wound J-90 for the neck, a standard Jazzmaster in the middle, and a WRJM in the bridge. I really love what Porter’s doing in the pickup world, but the selection here may be the only aspect of the guitar that may need some re-thinking. On their own, each pickup sounded great and well-suited to its position, but there was a disparity in volume between them that couldn’t readily be corrected with height adjustments. Really, it came down to the J-90 being louder than the other two, so perhaps a vintage wind on that one would settle in a bit better.

Something Cliché Involving the Word ‘Curves’

The control scheme on this one could be somewhat confusing if you’re expecting the normal layout of a Jazzmaster. Instead of the lead/rhythm circuits commonly found on the guitars, Shelton opts to use the on/off switch on the upper bass side horn to split the bridge pickup and add in the middle pickup via the rollers repurposed as volumes for the neck and middle pickups. Somewhat cumbersome the first time you use it, the array becomes second nature with a little persistence – and useful as well!

Even with the learning curve, there are some potent sounds on display here. Rather than shoehorn the same old descriptors for tones, why not just listen to the thing? Click the videos below for sound samples, including one that runs through all of the available pickup selections.

Hands-On Experience

From the moment I unboxed the guitar, it played magnificently. Shipped with 10 gauge strings, the action was low and comfortable and intonation was spot-on. Clean or distorted, the guitar had much to offer in harmonic complexity, never sounding dull or flat. Again, Rachel’s expert fret and nut work played a huge part in this.

img_2017With Mastery Bridge involved, it’s no wonder that the guitar felt solid and took all that my heavy right hand could give it. I’ve oft praised the Mastery Vibrato for finding a perfect balance of tension and smoothness, and here is no exception. With every wild stab of the arm, the guitar always returned to pitch and reacted tit-for-tat with any change in attack.

At home or a loud rehearsal, this instrument covered all of my tonal needs without sacrificing the integral, forward-facing characteristics of the guitar it’s based upon. Jazzmaster fans looking for more options should find their home in the Shelton. And, if wacky features aren’t your thing, Shelton does indeed offer more simplified and classic interpretations of the offset guitar.

Love Connection

I am in no way employing hyperbole when I tell you that this may be one of the most exciting and well-built guitars I’ve ever played out of the boutique market. The quality of this instrument is just superb, and you can tell that at the end of the day Shelton Electric care about making great instruments over statements. He lets the instruments do the talking rather than making bold claims about how his work will change your life.

Modesty aside, it just very well may.

img_1932

Tagged , , , , , , , , , , , , , ,

#NAMM2017 DAY 1!

Hail and well-met, favored readers. As you may already know, Thursday marked the first official day of the NAMM (National Association of Music Merchants) Show. Hall after hall, exhibit after exhibit, there’s so much gear packed into each square foot that it’s difficult at first to take it all in. I spent my first day milling around, getting my bearings on the densely-populated show floor, and in the company of good friends and new real-life acquaintances which were formerly of the internet-only variety.

Though I did my best to see and experience as much as possible, there was just too much to pack into a single day, so I’ll be returning to NAMM 2017 for two more days of coverage. In the mean time, I’ve hit some of the bigger booths to give you a taste of what’s in store for this year’s show.

EARTHQUAKER DEVICES (BOOTH 4296)

Running behind as I was, I rushed to get to the EarthQuaker Devices booth before the Vanessa Wheeler demo set was over. Alas, it turned out that she had fifteen less minutes than I believed, so I missed it. Still, I’m proud of my good friend for landing such a cool gig! And from the videos I watched on Instagram, her singer-songwriter vibe and chordal wizardry paired beautifully with the subtler side of EQD.

In turn, this afforded me the chance to fully experience EQD’s range of pedals with a BilT Relevator through their headphone rig. Among my faves from this year’s setup were the Acapulco Gold (a single-knob distortion) and the Rainbow Machine, which is pure joy in pink pedal form. The new Space Spiral seemed to be all the rage, and sure enough, this modulated and ethereal delay gave me literal chills, boasting sounds I never imagined coming from a delay pedal. It is 100% worth your time.

img_4637We stayed to see a demo set by Sarah Lipstate, who weaves spooky and cinematic tapestries of sound under the moniker Noveller. Armed with a ’65 Jaguar and a host of clever boxes, Sarah showered us in washy, moody tunes that were orchestrated movements rather than songs. Moaning and wailing, her guitar sounded less and less traditionally “guitar-like” as her set waned on. This is what I love about EarthQuaker’s NAMM presence: they choose such a wide range of musicians that the versatility of their pedals is absolutely clear.

Before we left the EQD area, we met up with a few cherished souls, among them Chandler Eggleston (guitarist for Carter Winter) and Andrew Sinclair from Madlab Coffee. We banded together, feeling much safer in numbers as we traversed the busy show floor.

FENDER (300E)

img_4640From EarthQuaker, we headed straight upstairs to check in on what Fender was up to at NAMM 2017. Fender’s exhibit is even more exciting than last year, boasting a ton of Custom Shop instruments and the new American Pro line as well. The full AMPRO line was well-represented: Strats, Teles, Jazzmasters, Jaguars, Precision and Jazz basses too. Decked out in new, bright colors, your first look at 2017 Fender is a pretty sight for sure.
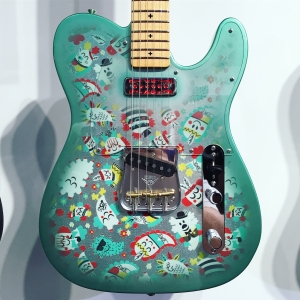
Walking toward the rear of the exhibit, you’ll start seeing Journeyman and Masterbuilt guitars for the year. Among my favorites were a Journeyman Relic Bass VI in Shell Pink, a host of sparkle-finished Custom Shop guitars, and a special collaboration with my pal Paul Frank. Yes, that Paul Frank. This Telecaster features a custom-printed foil paper under a lovely metallic burst, a Curtis Novak gold foil in the neck, and one of Fender’s new RD bridges. I always love to see Paul’s cartoons put to good use on a musical instrument.

The Paul Frank Telecaster is so wacky. I love it.

The Paul Frank Telecaster is so wacky. I love it.

We also ran into our pal Matthew Farrar from Fender’s Artist Relations department and had a lovely chat about staying healthy during NAMM. If you’ve never been, you may not have heard about the yearly bug that goes around, not-so-affectionally known as NAMMthrax. Having suffered from this last year––like a mix of the flu, pneumonia, and the less savory bodily functions––I can tell you, it’s earned a fearful reverence from attendees and exhibitors alike. Matt recommended getting sick before NAMM, but for those less inclined to get sick at all, carrying some hand sanitizer and overloading on multi-vitamins seems to be the usual preparation.

GIBSON

Before heading back downstairs to the main floor, we stopped by Gibson’s hall. As I walked between the ropes leading inward, a Gibson-branded girl in tiny shorts stopped me by placing her hand on my stomach. She then grabbed my badge and scanned it without saying a word. This was weird and uncomfortable.

Andrew is a total boss

Andrew is a total boss

It seems that scanning the QR code on our badges (and the personal info that goes with it) is the price of entry here. Andrew smartly asked if they were taking his info and when the girls answered in the affirmative, he held his badge against his chest and exclaimed “CAN WE NOT” as he passed them. I admired him for that.

Realistically, this probably leads to an innocuous email list, one that I’ll likely unsubscribe from as soon as the first blast hits my inbox. No harm, right? Thing is, this just didn’t feel good to me, and that’s the real damage here: Making consumers and retailers feel uncomfortable and possibly less welcome while trying to build buzz for new models seems like a total misfire.

Simply asking if I’d like to sign up for more info would have sufficed, or perhaps incentivizing the move somehow would have smoothed over the whole transaction; just taking it didn’t sit well with me. Gibson doing so with neither explanation nor respect for personal space made me want to leave before I’d even crossed the threshold. It should also be noted that Gibson are the only exhibitor doing this.

This out-of-touch practice did little to ingratiate Gibson to myself or my friends, and in fact, we left mere seconds later without really caring about the guitars or other products found there. And that’s to say nothing of how outdated the whole “booth babe” concept remains in 2017. So, no, I won’t be covering Gibson.

BENSON & RONIN (Booth 2294)

img_4675It’s always good to see friends, and Chris Benson has always been a good one to the shop. We’re huge fans of his amps, from the 30W Chimera and 15W Monarch to the 1W Vinny head & cab. At the time a demo was going on, so I didn’t get to spend any time with Chris’ bass amp, which I’ve been dying to try. Another mission for Friday, I suppose.

At the same booth we also found Ronin guitars on display. I don’t know about you, but those deep carves and uniquely crafted lines just slay me. Such artistry begs to be played, but like I said before, a demo was going on. We were SO in the way. I did, however, manage to snag a few photos. Just look at that!

This is beautiful.

This is beautiful.

SINASOID MEETUP!

Our friends and makers of our very favorite cables on the planet (including my own signature Redbeard cable) held a small get-together for artists in their Hilton Hotel room toward the end of the day, a lovely time for all. We got to hear about plans for 2017 including some very exciting, very hush-hush developments for the company. With as much traction and support as they had in 2016, I think this year’s going to be huge for them. I’m so proud to be a part of their lineup.

REVERB.COM (Booth 4368)

img_4687It’s always good to run into the fine folks at Reverb.com. Although Reverb is a retailer, they still brought plenty of eye candy for the show, including a Sheltone Electric GalaxyFlite, a custom Jazzmaster that exceeds all expectations from price to playability. I’ve had the great honor of keeping and inspecting two of Shelton’s guitars over the last year, so do expect an in-depth review of his wares soon. Spoiler: I love them.

Reverb also had another of my favorite builders on display, namely Paul Rhoney. The last Oceana available for some time is available there, its striking red-and-black finish catching the eye the moment it’s in view. Paul’s put his company on hold for the moment, but he’s not gone for good! He just moved to Portland, OR and you can catch him at NAMM with Veritas Guitars (Booth 2290). I’ll be checking in with them over the next few days.

Vanessa was suitably infatuated with this one

Vanessa was suitably infatuated with this one

I also had the absolute pleasure of handling a hardtail Jazzmaster-style guitar from Electrical Guitar Company, a first for me. I’ve always wanted to spend some time with their aluminum instruments, and even though I didn’t get to plug this one in, I came away from it completely impressed. I’ve never owned a Travis Bean instrument––the company handles the reissues of these legendary beasts––but I’ve long admired their quality and unique feel and tone, so being able to experience these guitars in-person was a huge treat for me. THANKS, NICK!

The Electrical Guitar Company Ken Andrews (Failure) model.

The Electrical Guitar Company Ken Andrews (Failure) model.

END OF DAY 1

I’ll be back tomorrow with more photos, info, and scoops on what’s new at NAMM.

Tagged , , , , , , , , , , , , , , , , , ,