Tag Archives: offset

Shelton Electric: A Very Special Valentine’s Review

img_1870Valentines Day came and went this week, a day filled with heart emoji, chocolates and stomach-turning cuteness from couples telling the stories of how they met. Love at first sight gets a lot of play in tales of romance, but it is most definitely a thing with musicians as well. It can even lead to trouble sometimes.

You’ve heard the stories of chance encounters and missed connections, I’m sure:

“I walked into the store, and there it was, just hanging on that wall. I had to make it mine.”

“Begged my friend to sell it to me for three years, and then one day he asked me if I still wanted it. I went to the bank right then and there!”

“I came back later that day with the money and it was gone! Wish I would have put it on layaway.”

For this piece, I want to tell you how Shelton Electric Instruments turned the longing gaze of this furtive lover into a two-week whirlwind romance with the GalaxyFlite model. Like the flickering light of a candle, our passion danced and then suffocated quickly, leaving behind only wisps of smoke and memories that won’t soon fade.

I Swiped Right on the Flite

img_1886The first time I saw Shelton Breeden’s work, I was intrigued. Shelton Electric Instruments offers up instruments based on familiar shapes but with a few modern twists that set them apart from a room filled with suitors. Such twists range from back-painted pickguards and racing stripe finishes, to electronic tweaks and non-standard pickup configurations. From the photos posted on Instagram, Shelton’s manifest commitment to quality shined in a frankly oversaturated social media landscape. I was hooked.

I skulked about on the app for some time, liking and commenting away but careful never to draw too much attention to myself. Just an admirer, this fellow. To my surprise, a direct message from Shelton soon appeared in my inbox, asking if I’d like to give some of his guitars a thorough once-over and offer some suggestions. I accepted without hesitation; any builder that wants to send me gear so I can blab about it on the internet knows how to push all of my buttons.

Red Dress and a Pearl Neck…lace

This case really gets the imagination going.

This case really gets the imagination going.

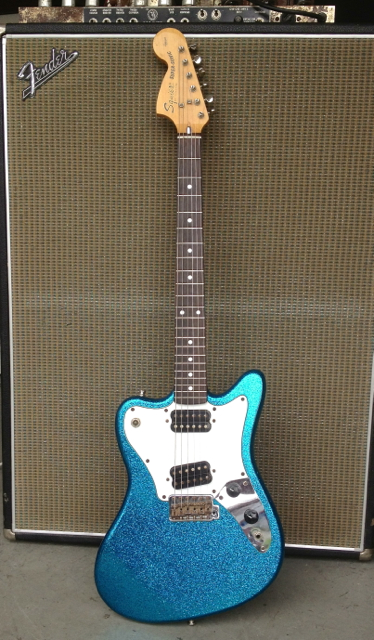
Quick to arrive at my door was this GalaxyFlite Super III model, which uses the classic offset shape as a basis for customization. Opening the very classy-looking case, that familiar candy smell of new finish rose from it and greeted me like a handshake. Immediately apparent is Shelton’s eye for detail, the nitro finish being flawless in both hue and sheen. Fiesta Red is one of those colors that just exudes cool, and Shelton certainly nailed the shade, rich and alluring as it should be. A bound-and-blocked rosewood fretboard was perfectly accessorized to the ensemble.

Speaking of visuals, let’s talk about that two-tone headstock. Some folks don’t seem to be on board with it, and I understand that it’s a deviation from the norm. Beauty is, as they say, in the eye of the beholder, yet this beholder loves it. It would seem that many builders prefer to stay in the well-tread peghead wheelhouse and only slightly tweak the shape so it’s not legally actionable. Instead, Shelton went for a design that’s half plank and half aircraft nose, evoking the image of a scimitar slicing through the air. Is it a success as unique and identifiable designs go? I’d say so. For those with less adventurous tastes, a new, sleeker version is already on its way.

img_1936Though the neck shares the 1 11/16” nut width of Fender reissues, Shelton’s shape is slightly more substantial than what you’d find on AVRI 62 models. The more modern 9.5” radius felt as comfortable as it did familiar, so players used to flatter or rounder necks should find something to love here.

The fretwork on this Galaxy Flite is perhaps the best I’ve seen on any custom instrument, and I’m not just being kind here – this work is superior to my own. Notes ring out clear in all positions, fret ends are meticulously sculpted, and the crowns are so perfectly rounded that you barely register them whilst sliding your hand up the neck. All of this is thanks to Rachel Quinn, who handles final setup duties for the company.

I Used “Pickup Lines” in a Previous Article So I Can’t Here

img_2023Equipped as standard are a few of my favorite brands, namely Mastery Bridge hardware, Porter pickups, and Emerson Custom electronics. Using such high-quality components means these instruments are guaranteed be fully functional and dependable right out of the box. Aside from matters of taste, there won’t be any need for round after round of upgrades here, setting Shelton apart from the few high-end builders that use cheap hardware and electronics.

Three Porter Jazzmaster-style pickups occupy a swimming pool body rout, a modern-wound J-90 for the neck, a standard Jazzmaster in the middle, and a WRJM in the bridge. I really love what Porter’s doing in the pickup world, but the selection here may be the only aspect of the guitar that may need some re-thinking. On their own, each pickup sounded great and well-suited to its position, but there was a disparity in volume between them that couldn’t readily be corrected with height adjustments. Really, it came down to the J-90 being louder than the other two, so perhaps a vintage wind on that one would settle in a bit better.

Something Cliché Involving the Word ‘Curves’

The control scheme on this one could be somewhat confusing if you’re expecting the normal layout of a Jazzmaster. Instead of the lead/rhythm circuits commonly found on the guitars, Shelton opts to use the on/off switch on the upper bass side horn to split the bridge pickup and add in the middle pickup via the rollers repurposed as volumes for the neck and middle pickups. Somewhat cumbersome the first time you use it, the array becomes second nature with a little persistence – and useful as well!

Even with the learning curve, there are some potent sounds on display here. Rather than shoehorn the same old descriptors for tones, why not just listen to the thing? Click the videos below for sound samples, including one that runs through all of the available pickup selections.

Hands-On Experience

From the moment I unboxed the guitar, it played magnificently. Shipped with 10 gauge strings, the action was low and comfortable and intonation was spot-on. Clean or distorted, the guitar had much to offer in harmonic complexity, never sounding dull or flat. Again, Rachel’s expert fret and nut work played a huge part in this.

img_2017With Mastery Bridge involved, it’s no wonder that the guitar felt solid and took all that my heavy right hand could give it. I’ve oft praised the Mastery Vibrato for finding a perfect balance of tension and smoothness, and here is no exception. With every wild stab of the arm, the guitar always returned to pitch and reacted tit-for-tat with any change in attack.

At home or a loud rehearsal, this instrument covered all of my tonal needs without sacrificing the integral, forward-facing characteristics of the guitar it’s based upon. Jazzmaster fans looking for more options should find their home in the Shelton. And, if wacky features aren’t your thing, Shelton does indeed offer more simplified and classic interpretations of the offset guitar.

Love Connection

I am in no way employing hyperbole when I tell you that this may be one of the most exciting and well-built guitars I’ve ever played out of the boutique market. The quality of this instrument is just superb, and you can tell that at the end of the day Shelton Electric care about making great instruments over statements. He lets the instruments do the talking rather than making bold claims about how his work will change your life.

Modesty aside, it just very well may.

img_1932

Tagged , , , , , , , , , , , , , ,

Upgrading a Squier J. Mascis Jazzmaster

FullSizeRender_1As you can imagine, I get asked about mods all the time. Recently, my new friend Brent brought his Squier J. Mascis model to me to hear my impressions of it and the many potential upgrades he was looking to have done. As-is, the JMJM is such a good guitar that many players don’t see the need for new pickups or hardware, but given the cheap price he paid and his needs, it totally made sense to do the work.

As I said before, the JMJM is a pretty cool guitar for the money. The neck feels great in your hand, the stock pickups are alright, and it has all of the right electronic appointments a Jazzmaster should have. Still, there’s room for improvement. Let’s jump in, shall we?

Tuners: Actually, these are good enough that I don’t see the need for a swap. As long as know how to string a slotted post correctly (string goes in the hole, 3-5 wraps) they work just fine. Great, actually. Even on my Squier VI!

Pickups: The stock units are pretty decent, but they are indeed P90s instead of Jazzmaster pickups, with big bar magnets and adjustable poles, with a tall coil that’s wound hot. If you want a real Jazzmaster sound, you’re not going to get it from those. Plus, as far as P90s go, I just feel there are better ones out there. I recommend a swap.

Electronics: On this particular instrument, I didn’t totally rewire the guitar. Generally, the one area where the current Squier builds fall short is the dependability of the electronics, which often develop shorts due to sloppy wiring or inferior parts. Instead, I went through and checked every wire and re-flowed some particularly bad connections. I do, however, recommend gutting the electronics and starting fresh with better components.

AOM/TOM Bridge: If you’re familiar with us, you’ll know that the AOM/TOM is the bridge we least recommend for offset guitars, both for sound and setup. Adjust-O-Matic/Tune-O-Matic bridges generally aren’t the correct radius for the most common Fender necks (7.25” and 9.5”) and even with heavy re-slotting of the saddles, it’s not always possible to totally correct that. As a result, the E strings will always feel more stiff than the others.

Additionally, even these bridges don’t always address the most common complaints with the original style bridges: buzzing and stability. This bridge already had some pretty nasty buzzing going on, which was mostly cured by re-seating the saddles. A shallow slot on the low E saddle meant that string impulsively jumped out with heavy picking as well. 

I recommend a change here, but obviously, your mileage will vary.

A Mastery bridge is almost always my first pick here, which does indeed require pulling the old AOM/TOM inserts, filling the holes, then re-drilling. Staytrem also makes a drop-in thimble replacement for these, so do keep that in mind if you’re looking for something less, well, surgical. They also used to make a drop-in replacement, but I can’t seem to find it on their site. I may be interneting improperly.

The Vibrato: I won’t totally rehash my arguments from our prior blog post on the quality issues of import vibrato units, but suffice it to say, if you’re a heavy trem user––hell, even a pedestrian––you should consider an upgrade here. Tuning stability is key, and the sloppy fit of the internals on these can be a nightmare.

In this case, we went with an American Vintage Reissue trem from eBay user trickedoutguitar, which came with the correct AVRI arm with the ever-so-lovely, gentle bend. Mastery also makes a delightful trem of their own, which I recommend highly for truly intense users.

IMG_8439So, when we finished our assessment meeting, I made my list of recommendations known. With Duncan Antiquity Is, a Mastery M1 kit, and an AVRI trem, I felt we’d pretty much covered everything. Obviously, the Mastery and pickups can be a significant investment for such an affordable guitar, but Brent wanted a guitar that would meet his needs without having to think about it ever again. Good call, says I.

After doing all of that and a proper setup by Yours Truly, I really believe we made a good instrument great. The difference in tone, unplugged and amplified, was immediately apparent. Whereas the guitar sounded pretty good plugged-in but was rather dead acoustically, the superior fit of the Mastery bridge and thimbles really made the thing come alive. And the trem? Smooth and immediate, and of course, stable as hell.

When I’m asked about my favorite Jazzmaster pickups, I always recommend Lollar, Novak, and Duncan Antiquity Is, the latter of which I feel does an excellent job of approximating the sound and response a 60+ year old black-bobbin pickup. In the case of this JMJM, we ended up with a brand new guitar, the sound of which belied its youth. Really a stunning pickup set. It has so much of the warmth and midrange complexity that’s associated with the best old pickups, woody and natural as can be.

IMG_8523

Brent’s finished Squier J. Mascis pictured with Artoo and Pancake

We came so close to that sound that I decided to do a comparison video of the J.Mascis  Squier up against my 1961 Jazzmaster “Pancake”, which is the greatest guitar I’ve ever played. This was all rather last minute and I didn’t yet have a proper microphone, but the iPhone did a good job showing some of the more overt differences between them. I even threw in “Artoo”, my 2007 Thin Skin with Lollars for fun. Check the video below!

In the end, Brent was absolutely blown away by his guitar, and so was I.

Tagged , , , , , , , , , , , , , , , , , , , , , , , ,

Boutique Builders and the Offset Vibrato: A Trem of Great Import

IMG_2580-imp

I spend the bulk of my professional life thinking about offset guitars, from the next way in which I’ll be able to explain solutions to the myriad perceived bridge issues, to my idea of the perfect Jaguar, to mods and possible set up techniques I’d like to explore on one of my own. These guitars have been a huge part of my career, and I’m happy to say that recently I’ve discovered that I have a nickname among some enthusiasts: “The Jazzmaster Guy”.

Yes, dear reader, you likely know already how obsessed I am with these models, and in the same way that some proudly identify with a political party or religion, I wear my love of these quirky guitars as a badge of honor. If elections were held to determine the supreme guitar ruler of the world, I would firmly be in the Offset Party. I would totally rock a “Jazzmaster 2016” or “Jaguar 2016” bumper sticker. In fact, that might be worth putting some effort into.

Recently Summer NAMM took over the Music City Center in Nashville as well as our Facebook, Twitter, and Instagram feeds. Gear lovers had a lot to look forward to, with new offerings from boutique and indie guitar, pedal, and amp makers as well as updated models from the big boys, and even if you weren’t able to attend in person (like me) there were plenty of goodies showing up online to satisfy even the most stodgy of enthusiasts. Among said goodies were plenty of models in the offset tradition, which is something that should have elicited more excitement in me than I actually felt.

It’s true: everyone makes an offset guitar these days, and how could we begrudge them that? These guitars have never been more popular, what with the spate of indie bands, aftermarket parts like the Mastery Bridge, and Nels Cline’s mind-altering musicianship, new Jazzmaster and Jaguar models (as well as variations on the theme!) are flooding the market at rates never before seen or anticipated. What was once a bargain-barrel, “crappy” guitar is now every bit as coveted and hallowed as some of the other most successful and idolized guitar models out there.

But with all of the complaints levied against these models (all of which we disputed and dispelled in our Demystifying series) one would expect that new offerings would perhaps understand not only the setup techniques involved in making these guitars play as Leo Fender intended, but also the very real affect of sub-par parts on the tone and functionality of these amazing, misunderstood instruments.

And that’s what concerns me about these upmarket models and fresh takes on famous designs, that there appears to be a disturbing trend in the “boutique” guitar market far more pervasive than relic finishes, self-tuning guitars, and ultra-hot gimmicky pickups:

$2000 guitars with cheap import hardware.

Offset Apart

IMG_2410-imp

My favorite iteration of the offset vibrato: the Pat Pend unit found on my ’61 Jazzmaster.

Many builders these days have homed in on the hot, hot, hot market share the offset body design has carved out for itself. Never more popular or readily available, the Jazzmaster and Jaguar-like body designs invading stores and internet forums alike are often as enticing as they are expensive. Offsets are being turned out in huge numbers these days, and so even small builders are looking to remain competitive in this not-so-niche market, and in order to stay that way, some builders are quietly installing inexpensive hardware on their guitars. And because we’re seeing this practice so often, these expensive custom guitars don’t perform nearly as well American reissues offered by the big company with the F-logo. I find that to be inexcusable, and too often, guitar makers are ignoring what I would argue is the most important piece of hardware on the guitar in terms of tuning stability: the offset vibrato tailpiece.

If you’ve read our Demystifying series, then you know that, when properly set up, Leo Fender’s offset vibrato design works flawlessly. Seriously, take a moment to read those articles, then come back to this one with your mind blown, and thus, more open. The offset vibrato is so popular right now for a reason, and that reason is, it’s stable as hell. When well-maintained, I can do more and get more out of the offset vibrato than I can with just about any other unit on the market, and although it may not ‘dive bomb’ the way a Floyd Rose does, how many non-locking trems do you know of where you can depress the bar the whole way, strings flopping about, then release and have it come straight back into tune? 

(For the record, I also love Gibson’s equally maligned Lyre Vibrola, Bigsbys, Rickenbacker’s Accent, and the tailpieces found on old Silvertone guitars. Sorry for answering my own question.)

But hold on a sec, the above statements come with a disclaimer: I’m only referring to vintage and US reissue tremolo units. There is no import part on the market that works as intended.

SB-0211-010-w

From Allparts.com

I’m quite honestly shocked at the number of high end offset guitars at SNAMM  equipped with the unbranded offset vibrato, a unit that can be easily obtained from many parts suppliers yet is never worth even its modest cost. The reasons I’m so down on the ubiquitous, no-name import trem unit is that the parts are made from pot metal, poorly machined, and are generally bulkier in design. They also happen to have arms with the least graceful bend imaginable, something that I’d contend is as much a part of the feel of the trem as the spring.

See, not only are there issues with arms spinning freely, collets breaking and never quite locking-in properly on those units, they also just don’t stay in tune as well as those made in the America. Parts that don’t fit properly together mean that the unit won’t return to pitch or “zero out” perfectly. They feel cheap, and comparing one of these import trems with the real thing, one can plainly see the stark difference in quality between them.

Recently, my pal Jessica Dobson of Deep Sea Diver brought in a new guitar for a setup and to install new pickups, and as part of a setup, I always ensure that the trem unit functions smoothly and accurately. In the case of this instrument and many like it, the vibrato wouldn’t return to pitch even when properly set up. I removed and dismantled the unit, and saw something that I’d seen many times before.

IMG_2590In viewing this photo from my Instagram feed, you should be able to see that the pivot plate on this Asian-import trem is sloppily manufactured, and it’s not just this particular one! Every single one of these I’ve ever worked on is malformed in some way, leaving the hope of tuning stability a pipe dream at best. Now, this can be corrected to some extent by doing as I did here, grinding away the excess material until the plate was left with sharp edges and equally smooth contact points. And while this does ensure that the trem works much, much better than it did, weak springs and inferior materials will continue to cause issues much farther down the road.

Another mark against the import unit: bad metal sounds bad.

A Call to Trem Arms

If you’re a guitar maker offering a Jazzmaster-type model (or any model with that particular bridge and tailpiece combo) then I completely understand that you can’t just put a Fender-branded part on your guitar. In that regard, the no-name, unbranded import vibrato seems like a good alternative, and one that’s easy to relic to hell and back, if that’s your bag. The thing is, because they’re so poorly-made, you may be offering a guitar with a flaw right out of the gate. But there is hope!

One option would be purchasing the U.S.-made ‘real thing’ and replacing the face plate. Companies like Faction Electric Guitars offer stainless steel plates (designed by our pal Paul Rhoney) that would suit this purpose well. Sure, that’s an added expense, but if you’re already charging $1800-$2500 for a guitar, well, it’s a worth while one.

An even better option? Investing in the Mastery Vibrato, a unit that’s free of ties to the California manufacturer with the familiar name that works perfectly and is perhaps the closest in feel and tonality to the units found on vintage offset guitars, and as many of us offset aficionado will tell you, they’re the cream of the crop. Woody designed this piece as an upgrade to the original, with the a new carbon steel spring meant to feel and perform as the originals, low-profile screws that won’t chew through your strings, and a pivot plate that runs the entire length of the string anchor plate. Sturdy, solidly-built, and tonally brilliant, this all adds up to the perfect vibrato for your equally well-made and attractive instruments.

If you’re building your own guitar from parts and you don’t have the coin to drop on upgraded or vintage units, you can find Fender AVRI trems in the $50-60 range, and you can even find ‘aged’ ones on eBay. The no-name unit goes for $35 over at Allparts but don’t say I didn’t warn you. Unfortunately, at this time the  import unit is the only option for those in need of gold hardware.

Now, the purpose of this article isn’t to call out any specific builders out there, so I’m not going to include the names of guitar makers that use the dreaded “no-name” vibrato. Instead, here’s a list of some of my favorite builders that, instead of attaching subpar parts to their instruments, go the extra mile and dollar to install the precision-machined Mastery Vibrato. These are builders that care about quality that you can buy from and know that your instrument will perform as promised every single time.

In alphabetical order:

Ayers
BilT
Collings
Creston
Deimel
Echo Park
Kauer
Rhoney

That’s all I could think of right now, but I’ll be sure to update this post once my other guitar-building friends read this and yell at me for forgetting them. I’ll deserve that much at least, I’m sure.

Anyway, this one’s the only unbranded trem I’ve ever liked, found on Freddie Tavares’ prototype ’58 Jazzmaster in Desert Sand with a huge maple Stratocaster neck and a sweet black anodized guard. Special thanks to Mark Agnesi of Norman’s Rare Guitars for letting me have an unforgettable hour with this thing. What. A. Guitar. Expect a short article about that hour in the future!

IMG_3701

If I only had $100K.

Tagged , , , , , , , , , , , , , , , , , , , , , , , , , , , , , , ,

Whoa… Busy Month and a Blacktop Jazzmaster

It’s been quite a while since our last post, but for good reason: we have been the busiest we’ve ever been. Not only are our wares selling like hotcakes (Fortune 500 here we come?) but there has been a marked increase in patrons to our humble store. Some come in for work on their prized amp or guitar, some come to browse, and a few come in just to have a drink and hang out – exactly the kinds of things we’re about!

When you own a shop in a street-level garage that’s around 500 square feet, two or more customers can make it feel very, very busy. Add to this the army of gear we’ve acquired and a veritable mountain of repairs, and I think you could begin to infer just how busy we’ve been.

Even so, I thought I’d take this opportunity to update both the website and our faithful readers on just what the heck we’ve been doing this holiday season. I mean, it’s not all eggnog and carols and flasks of whichever alcohol we’re drinking these days!

The Modified Fender Blacktop Jazzmaster

IMG_1897-impDecember marked the end of a months-long project, one that took far longer to complete than I had expected. Why? Well, it’s because of that dad-blasted Gold Foil.

Our friend John (the owner of this fine machine) saw what we did ages ago with the Skyemaster and wanted something similar but tweaked to his personality. Two additional pickups were to be installed – a total of four on the guitar – to augment the already wide range of tones available to him. He provided a cool old Framus/Guyatone pickup for the middle position, and installing that required routing out the body and pickguard. Pretty straightforward.

However, John was really into the ethereal, otherworldly sounds that came from the Skyemaster’s behind-the-bridge unit, so finding a thin, small pickup that would fit under the adjusted string length of this model was a bit of a problem. We eventually decided that an old Dearmond/Rowe Gold Foil would do the trick, but that would present its own challenge: finding one for a good price.

John and I agreed that, with the recent spate of popularity surrounding these pickups, it would be a game of waiting to pounce on an under priced pickup to keep his already high costs down. I was more than happy to save my customer some money, but between searching and all of the other jobs I’ve had, it started to feel hopeless there for a bit. Luckily, after some time I was able to track one down that was in need of a rewind.

From then on it was smooth sailing. Here’s a brief rundown of what we have going on with this one:

-Stock neck and bridge pickups
-Added Guyatone/Framus pickup in the middle position
-Gold Foil (no base) mounted directly to the wood, no routing required!
-Three way toggle functions normally (N, NB, B)
-Two additional pickups are selectable via two push-pull pots on the Volume (middle) and Tone (behind-the-bridge) pots

So, how does it sound? It’s amazing. The middle pickup lends a quacky sort of darkness to the overall characteristics of the stock pickups, and the BTB unit enables all of the weird, Waterphone-like tones you’d expect. This is certainly one of my favorite mods, and it’s surprisingly useful. I’ll get around to doing this to my own guitar soon enough, I’m sure. Wanna hear how it sounds? Check it out:

There are three more videos detailing some of the quirky sounds available via the modified electronics. Feel free to watch!

I’m going to do a couple more quick updates in the next few days or so. Keep your eyes peeled! Lots more cool stuff on the way!

UPDATE: Special thanks to our pals over at Ampersand Amplification for this custom meme! We think it’s appropriate!

1390651_794233147270393_15866174_n

Tagged , , , , , , , , , , , , , , , , , , , , , , , , , , , , , , , , , , , ,

“I’m Feeling Supersonic”, a Squier Super-Sonic Upgrade/Mod Guide

IMG_6309By Michael James Adams
Recently, a long-held dream of mine came true: finally owning a Vista Series Squier Super-Sonic.

When Squier released the Super-Sonic in the late 1990s, I was immediately smitten with its reverse-offset body and headstock, fast looks and the sparkly blue finished model in particular. I had to have one. Unfortunately, it took until May of 2013 – 17 years after it was released – to make that dream a reality. Why wait so long?

For one, I had never seen one in person as none of the guitar shops in my area were willing to take a gamble on a flashy Squier guitar. I think the look of the thing scared them off, and soon I became caught up in other instruments. I consider myself lucky to have owned quite a few cool pieces in my day, but once a month or so my mind would return to the Super-Sonic, which has become a bit of a collector’s item due to its rarity, and players are seeking them out for their short scale and more familiar control layout as compared to the model’s close relative, the Fender Jaguar.

I finally found one for sale via Craigslist, and this one happened to be in Ohio. The guy was open to shipping and payment via PayPal, and was totally up-front about the broken pickup selector switch, a few scratches and lack of a case. I’ve never been scared off by a guitar having been ‘played in’, as they say, and because I was able to negotiate a better price I had no hesitation in pulling the trigger.

Once the guitar arrived, it was clearly in great shape. Because of the sparkly finish it was really difficult to detect the scars the seller had mentioned, but once I found them they turned out to be mere surface abrasions that easily polished out. Win for me! There was an added strap button and the switch tip had unfortunately snapped-off and was hopelessly lost years ago.

Without hesitation, I set about bringing this treasure up to spec in the hopes I’d be able to play it loud and proud at a forthcoming gig. As Ten would say, “Allons-y!”

Electronics

Even though I’d been pining for a Super-Sonic for years, I was also well aware of their apparent shortcomings. Probably the biggest detractors from these amazing Japanese-made guitars are the pickups: Duncan-designed and produced in South Korea, these pickups are known for flabby, muddy sound and insane amounts of squeal. Once I finally had one in my hands, I knew instantly why so many disliked them. They’d have to go.

IMG_7380-impLucky for me, our good friends at Fastback Custom Guitars here in Seattle had just released their vintage-inspired ’59 Zebras, a set of pickups that aim to replicate that vintage Gibson sound with a slight modern twist. Not only do they sound great, but they also look the part, making them a beautiful addition to the already flashy nature of this guitar. A definite upgrade, and you can read my review of these impressive pickups here.

Next on the docket was replacing that broken pickup selector switch. Truth be told, I would have replaced it anyway, as I have little confidence in plastic-backed Asian market devices, having broken plenty of them in my day. Yes, my heart truly belongs to Switchcraft, and their short model was just the thing I needed for this project. Solidly built and just the right size, the switch also has a satisfying amount of resistance when flipping from pickup to pickup. AllParts also chooses randomly which color of tip to send, so I definitely lucked out with the correct black.

Since we’re being honest, I should admit that I just don’t trust the electronics found in most Japanese-made guitars. I’m not saying that the stock parts are unusable, but knowing how hard I am on guitars it’s always a good idea for me to fully upgrade the wiring harness. Pots, switches, wiring – all of it goes. I used cloth wire, CTS 500K pots and a .022 Orange Drop cap.

If you’re at all familiar with this model, you’ll note that the two controls found on its chrome plate aren’t what you’d expect; instead of the usual vol/tone combo, what we have here is two controls acting as individual volumes for each pickup. A nice thought, but I’m the kind of guy that likes having a tone control and a good capacitor on hand. I set about wiring the guitar in the more familiar 1950s Gibson tradition, for which I always use a 1950’s wiring diagram, which allows the pickups and tone cap to work together more transparently.

Hardware

I didn’t go quite this far because a) I’m quite content with the bridge as-as and b) I’m only willing to indulge my obsessive-compulsive upgrades to a certain extent. Even so, the original bridge and hardware aren’t bad at all. In fact, they’re quite good.

The original tuners work brilliantly, but if I were in the market for replacements I’d be looking to my favorite brand Tone Pros. Their Kluson-style machines are made with higher quality materials than the originals, and are super authentic in look but precision-machined for modern reliability. Wonderful stuff, there.

As for the bridge, it’s a great unit that stays in tune nicely. I could see myself going for a Callaham bridge at some point, but I’m not necessarily looking for true vintage Strat tones, you know? Man, what I’d really like to do is pull the trem, fill the cavity and route the body for a Jazzmaster/Jaguar vibrato and a Mastery. I won’t, but that would be amazing.

Cosmetics

Flashy as she was, there were a few visual detractors that I couldn’t simply gloss over; I’m a picky guy, I guess.

For one, the original knobs were a good bit smaller than standard Jaguar knobs, and of course won’t fit on the US pots I dropped in the guitar, so they had to go. I ordered some genuine Fender replacement knobs, which looked very, very new when they arrived. Given that my guitar had been played hard and had tarnished hardware, it didn’t make aesthetic sense to have bright, shiny knobs on the control plate. So, I set about the task of lightly aging them to match, using Other Mike’s ’63 Jazz Bass as my template.

IMG_6652IMG_6650

Using my coarse-grit polishing pads I was able to de-gloss the knobs sufficiently, and after that I sprayed some lightly tinted clear coat on them to soften the look of the indicator. After dirtying them up a bit, I was left with knobs that had the perfect well-worn attire that belied their age.

The other eyesore about the guitar was that the previous owner had added a strap button on the upper bout, a common mod for these guitars. If you didn’t know, the Super-Sonic has its upper strap button on the neck plate, utilizing a longer anchor screw to accommodate the button itself. Some people really don’t like this – I didn’t at first! – but having gotten used to the way attaching the strap to the neck plate button shifts the guitar forward I couldn’t see myself using the other ever again. So, I set about filling in the hole and making it as invisible as possible.

IMG_6795I doweled the hole with some scrap wood we had laying around the shop, and after the glue was dry my aim was to create a perfectly-shaped surface for whatever new finish I would lay on top. Because the addition of the new strap button had chewed out some extra wood, I had to use wood putty to fill in the missing bits. Simple enough!

After allowing the putty to cure for a few days, I was stuck wondering exactly how I was going to recreate the look of blue sparkle finish in such a small area. If it were a solid color or even a burst, that would be a far easier task; laying down sparkles in a convincing way would be tricky, especially when it comes to the way the original finish reflected light…

Then an idea struck me: “What about glitter glue?”, I wondered to myself. Soon enough, I found myself on the hunt for the right shade of glitter at Michael’s, which was appropriate. I stumbled upon the Recollections brand and found exactly what I was looking for: Peacock Blue.

That’s a nice match, innit? It’s even better out of the bottle. Michael’s only carried the two smallest flake sizes in their stores, so the next one up would have been perfect. But hey, I nailed the color, so why complain?

It took a few days to get this right, honestly; laying down layer after layer of glue and waiting for it to reduce as it dried, never quite being able to predict how the flakes would lay. Very tedious. After I achieved the right about of sparkle density, I covered it up with super glue, which polished to a high gloss after it dried. I think it came out pretty well, considering. I mean, it’s not an exact match, but it’s pretty damn close. And now I don’t have an extra strap button hanging out, nor do I have to deal with an open wound on my beloved instrument.

I forgot to upload this shot in my initial post, but better late than never. Like I said, I'm super proud of this!

I forgot to upload this shot in my initial post, but better late than never.

Like I said, I’m really proud of how this turned out. Up close, you can definitely see the scar, but from a few paces away, the mind simply glosses over the offending spot, with the sparkly finish blending together in a pleasing way. Success!

The Final Product

Totally stoked.

Actually, I just noticed that the added strap button is still installed in this picture. I’ll replace it later. Grr/argh.

IMG_6642-imp

– MJA

Tagged , , , , , , , , , , , , , , , , , , , , , , , , , , , , , , , , , ,

Demystifying the Fender Jazzmaster and Jaguar, Pt. 2: Bridge Over Troubled Vibrato

IMG_2101By Michael James Adams

A few weeks back, we took some time to fully explain the electronic innerworkings of Fender’s paradoxically well-loved and oft-maligned models, the Jazzmaster and Jaguar. For many players, the tonal options available on these guitars is a breath of fresh air; for others, the switching becomes an exercise in futility, leaving them to wonder how to just turn on the bridge pickup. Hopefully we helped!

In today’s column, we’re going to dive into what be the most misunderstood and subsequently damning design element on these amazing guitars: the bridge.

It’s a common occurrence for players who are used to Strats and Teles or Les Pauls to get the Offset itch and pick up a Jazzmaster or Jaguar and find that it doesn’t play quite the way they expected: strings will slip out of their grooves with moderate pick attack, the bridge sways back and forth with vibrato action, and sympathetic ‘ghost’ notes will ring out from behind the bridge, prompting many stymied players to install a Buzzstop. Please, don’t do that just yet – I’m begging you to get to know your seemingly unwieldy friend before you do something rash.

Shim Shenanigans

Conventional guitar wisdom tells us that shims are bad. They’re tone-sucking, sustain-killing, useless pieces of paper that shouldn’t come anywhere near a neck pocket, right? Well, about that…

That's A Bruce Campbell, not THE Bruce Campbell. Unfortunately.

That’s A Bruce Campbell, not THE Bruce Campbell. Unfortunately.

Most of the vintage Fender guitars we love came from the factory with at least one shim installed, and I’ve seen vintage guitars with four or more original shims! Telecasters, for example, might have a shim in the front edge of the neck pocket so that when the guitar is strung, the strings sit closer to the top of the ashtray bridge instead of down in the middle, which isn’t exactly the most comfortable place for picking. Also, the height adjustment screws on the brass bridge saddles could be longer than necessary, which means sharp pieces of metal digging into your picking hand. Not fun.

Many players operate under the belief that a shim will kill their tone, and to an extent they have a point. Obviously, for maximum sustain and tonal transfer, it makes sense to have a tight neck pocket with full wood-on-wood contact. Here’s the thing: tone is subjective, and the vast majority of us won’t be able to hear the difference between a shimmed and un-shimmed guitar. Add to that the fact that many of the old-school tones we’re all chasing were created with shimmed guitars, and the argument gets even more murky. And, unlike Strats and Teles, Jazzmasters and Jaguars were actually designed with shims in mind!

Break Angle Benefits

You see, Leo Fender knew that his floating bridge design needed a certain amount of downward force to work properly, so he used shims in the leading edge of the neck pocket to adjust the angle of the neck, causing the strings to pass over the bridge at a sharper angle. This is called the break angle.

The further back he tilted the neck, the bridge would have to be set higher to achieve playable action, and thus, more downward force on the bridge. More downward force on the bridge also means greater tonal transfer via the contact between the bridge and its thimbles, which in turn transfer that vibration to the body, and then who the hell really knows how much sustain and resonance you’re losing or gaining?! It boggles the mind.

When players complain about their strings slipping out of the tiny grooves on their saddles, more often than not the problem isn’t the saddle, it’s the aforementioned break angle.  A sharper break angle means more downward force on the bridge, which in turn helps to keep the strings seated! One other solution is to deepen the grooves with a file, which is a fine solution that I’ve had to use a few times. It’s not my first choice fix, but with some guitars with worn or import bridges, there’s not much else you can do, short of replacing the bridge. More on that later.

Players will also cite excessive mechanical buzz from their bridges as a source of frustration, but again, I point to neck/break angle as the first solution. Most of the time, the bridge buzzes because of a weak break angle and thus, less pressure, which means the saddles themselves aren’t tightly seated on the bridge plate. Tilt that neck back and voila, the buzz disappears. At least, it usually does; new bridges that haven’t been played-in will often make noise because they don’t have years of oxidation helping to tighten things up. In that case, either sweat a lot or dab some blue Loc-Tite* on the saddle screws, which will not only diminish rattle but also ensure that screws don’t turn when you don’t want them to.

The other solution to this problem is the Buzz-Stop, an add-on unit that screws into the trem plate and forces the strings down toward the body. While this solution certainly works, it also kills the vibe of having a Jazzmaster or Jaguar; the strings behind the bridge are deadened – a huge part of what makes these guitars  so fun! – and the vibrato has another point of friction to contend with, making it work less efficiently. It also makes the guitar feel different in terms of playability, but feel is subjective.IMG_4061

Rock. YEAH. Ing. YEAH. Bridge. YEAH. YEAH. YEAH!

For the Jazzmaster, Leo Fender designed a new “floating” vibrato system which revolved around a bridge that rocks back and forth as the whammy bar is actuated and promised unparalleled control and flutter as well as better tuning stability. But if this system was supposed to be so great, why does it seem like everyone complains about it?

A lot of people don’t understand that the bridge is supposed to rock, which understandably freaks them out. I’ll admit that this feature isn’t my favorite element of the design, but it really does work, but not perfectly. The bridge doesn’t always return to its zero position, but this is a problem just about every trem system on the market has, and if we lived in a perfect world it would be enough.

If the rocking bridge bothers you and makes your intonation spotty, a lot of us will wrap the bridge with foil tape, which locks it into place in its thimbles. The vibrato still works well like this, but again, it’s not a total solution. This is yet another issue addressed by the Mastery Bridge, with its larger diameter posts that fit snugly into the bridge thimbles.

A Word About String Gauge

When Leo was rolled out the Jazzmaster, he intended to market the guitar to Jazz players, hence the addition of the darker preset rhythm circuit. Because of this, the guitar was also designed with heavy-gauge flat-wound strings in mind. Back in the day, light guitar strings weren’t readily available, especially when it came to flats. That’s why you so often hear older guitarists talking about using a banjo string on the high E and moving the rest of the set over one string! Jazz players were often using sets as heavy as .014”, and .011” sets were considered pretty measly by comparison.

When the Jazzmaster rolled out, the idea was that these jazzers would be using at least .012” flat sets on the guitar, which have much more tension than today’s slinkier round-wound strings. Heavier strings equals greater tension, get it? If you ever try to put flat-wound 12s on a Jazzmaster, they usually won’t go anywhere.

When you want to use light strings on a Jazzmaster or Jaguar, you’re going to have to compensate somehow. You’ll need to increase the break angle and adjust the bridge, but if you’re going lighter than .011” sets you might also consider swapping out the bridge for those found on Fender Mustang guitars, which have a single, deep groove for each string. Or, you could go for the ultimate upgrade, the Mastery Bridge, but I’d make that recommendation to anyone regardless of string gauge. The Mastery Bridge is hands-down the best upgrade you can make to your Fender Offset guitar in my opinion. With it, you may still need a bit of a neck angle adjustment, but your strings will definitely stay on their saddles.

Next time, we’ll take a brief look behind the bridge and how to work with the vibrato unit for greater tuning stability and control. Wanna go wild and return to pitch? We’ve got you covered!

Mastery on a '58. Yessir.

Mastery on a ’58. Yessir.

*CAUTION: Never, ever use the red Loc-Tite on guitar parts unless you want them permanently frozen in place. The blue variety is meant for a non-permanent bond, allowing the user to make adjustments down the line. I think they’ve just come out with a green formula as well that’s not as strong, but I haven’t used it. Also, that stuff dries clear, so don’t freak out when you put blue goop all over your shiny new guitar. It’s cool. Simmer down.

Tagged , , , , , , , , , , , , , , , , , , , , , , ,

Demystifying the Fender Jazzmaster and Jaguar Pt. 1

IMG_3071-impBy Michael James Adams

It’s no secret that we here at Mike & Mike’s Guitar Bar are BIG fans of Fender’s oft-maligned Jazzmaster and Jaguar guitars. Top of the line in their day, these guitars are perhaps the most misunderstood instruments that Leo Fender ever created, a sad truth that to this day follows these wonderful guitars like a scarlet letter.

Why are these guitars so misjudged? For starters, Fender’s line of “Offset” guitars – so called because of the adjusted waistline body design – shared little in common with their more straightforward brethren, the Telecaster and Stratocaster. Those guitars were plain-as-day in terms of fit and functionality; when one looks at a Tele or a Strat, there’s little question as to the purpose of their respective three- and five-way switches, where the strings anchor, or what kind of music one can play on them.

When first released in 1958, the Jazzmaster was a bit more nebulous than its forebears, intended for Jazz players who largely dismissed the guitar. The first Fender guitar with a rosewood fretboard, the Jazzmaster also included Leo’s latest innovations including the floating bridge/vibrato unit and wide, flat pickups designed to pick up more of the string’s vibrational length, resulting in less sustain and a warmer overall tone than the Telecaster or Stratocaster. Luckily, instrumental rock and surf players (and even a few country players!) soon embraced the guitar, giving the Jazzmaster a new direction.

IMG_3779-impBy the time the Jaguar was released in 1962, the surf craze was in full swing and it would appear that Leo tailor-made the guitar to appeal to instrumental rockers. Chrome for days, a slightly modified, faster body, a shorter 24″ scale and a newly-designed Fender Mute all contributed to the wild looks and distinctively percussive sound of the model.

Hard to pin down as they may have been, these two models were wildly popular in the early to mid sixties, with sales numbers overtaking those of the Strat and Tele, which were at that time experiencing stagnated sales and a general view in the guitar world as being old-fashioned. The new, sleeker Offset Fender guitars certainly sold well, but soon enough public opinion began to sour. What went wrong?

As I mentioned before, these guitars shared little of the design elements of their predecessors, which is something many of us appreciate today. Unique controls and string length behind the bridge appeal to those of us looking for something different, from shoegazers to alt. country troubadours. With that recent spate of popularity have come numerous upgraded parts that promise to improve the feel and playability of Offset guitars, including the mind-blowing Mastery Bridge and the Staytrem. Sadly, this lack of familiarity may have proved to be these models’ undoing in the long run, with players frequently complaining that the guitars were confusing, poorly made or impossible to keep in tune.

In this series, I’ll attempt to address a few of these complaints, and explain why the very designs that confound so many are, in reality, brilliant.

“IT HAS TOO MANY SWITCHES!”
It’s not uncommon to hear the above phrase uttered ad nauseum at guitar stores and internet forums alike. It’s frequently followed by, “What the hell do they do?!” and “My brain hurts.” In reality, the switches aren’t all that hard to figure out, and with just a few minutes of patient open-mindedness most players can easily adapt to the layout.

IMG_3699Jazzmasters have the decidedly more familiar control layout, with a Gibsonesque three-way toggle switch on the treble-side bout. Obviously, this one changes the active pickup selection from Bridge, to Bridge and Neck, and Neck alone. The thing that tends to get murky for folks is the switch located on the upper bass-side bout: the Rhythm Circuit.

The Rhythm Circuit was designed with the intention of giving the player a darker preset sound for rhythm play. A different array of pots (50K tone, 1M volume) lends to the darker sound, contrasting nicely with the Lead Circuit’s brighter personality. (1m for both) Roller knobs poke through slots on the guard that allow the player to easily change settings without much chance of settings being changed by vigorous play. Flip that switch to its ‘up’ position and you’ve got a rounder, bassier tone at the ready, one which I frequently utilize for a clean, somber tone or to mimic synth craziness with a big fuzz and an octave pedal. Even so, most players will choose to ignore this optional circuit as a nuisance or a design flaw, but do yourself a favor and play around with it! It’s great!

IMG_2687

L-R: ‘Strangle’ switch, Bridge Pickup, Neck Pickup. Simple.

The Jaguar, however, seems to be the guitar with the most problematic layout for some players, and while I can understand why it’s so intimidating, again I implore those stymied masses to have patience. Don’t let those little chrome plates get the best of you!

Thankfully for most, the upper bout switching is exactly the same as the Jazzmaster Rhythm Circuit. The three switches on the treble-side bout of the guitar control on/off for both pickups and what’s known as a “strangle switch”, a capacitor that can be engaged to bleed away bass frequencies, resulting in a thinned-out tone that’s perfect for biting leads or cutting rhythm work. Thanks to this, the Jaguar can easily be the most versatile guitar in a player’s arsenal.

If you’re still feeling vexed, check out the Interactive Jaguar instruction manual over at The Higher Evolution of Offset-Waist Guitars.

We’ll continue shedding light on these amazing guitars in part 2, where we discuss the floating Bridge, from its intended design to tips on keeping it functioning properly even with heavy trem use. Stay tuned!

We also believe that we perform the best Offset setups in the Pacific Northwest. If your Jazzmaster, Jaguar, Electric XII, Mustang or Bass VI needs some help to sound and play its best, stop by Mike & Mike’s Guitar Bar for a free consultation!

Tagged , , , , , , , , , , , , , , , , , , , , ,