
After a years-long hiatus, the Demystifying series is back!
First, I need to say thanks to all of you that have checked out the blog, and in particular the many that have shared and reposted these articles. Because of their popularity, Premier Guitar recently asked me to write an offset guitar setup guide for publication, which you can find in the May 2017 issue. AVAILABLE NOW IN STORES AND ONLINE!
So thanks to all of our readers, customers, and friends––without your support, this never would have happened. 
The one bit of hardware I’ve not discussed previously is often thought of as a vestigial, an hold-over from a different time fit for the bin. Ultimately, it’s up to you if you’re ever going to use the thing, and to be honest, it seems like many don’t. However, if you’ve ever been curious about it, or if you use it but find it problematic, then friend, I come bearing glad tidings. I am of course talking about the Fender Mute.
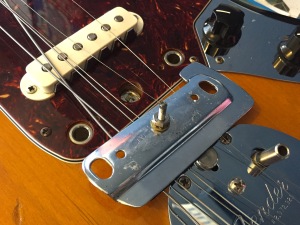 A feature shared by both the Jaguar and Bass VI – though not across all models or years of production – this curious metal plate was originally intended to be a surrogate for palm muting. Couldn’t be a simpler mechanism, really: the mute is secured to the body by two screws, and the long bolt in the middle pivots on a spring-loaded plunger sunk into the guitar body. The mute can be engaged by pressing on the plate, shifting it back and forth in place, causing the foam pad to make contact with the underside of the strings.
The Fender Mute leaves the player’s picking hand totally free for strumming or sustain-less leads. This gives the device a sound distinct from traditional palm muting techniques, one widely used on instrumental surf recordings of the 1960s. What’s it sound like? I just happen to have an example for you here:
Like the Fender offset bridge, the mute requires some extra thought to set up correctly. Really, the whole procedure comes down to balance; the mute has to be set to engage smoothly while allowing the bridge to be lowered enough for playable action. If the mute sits too high, the bridge will rest on its mounting screws. Too low, and the mute won’t engage at all.
 It’s best to begin with the mute installed on its own––leave the bridge for later. Remember those two mounting screws I mentioned earlier? You’ll need to find the lowest possible setting for them where the mute still pivots. Try screwing them in all the way, then backing off until the foam side of the mute pops up and stays put. Then, install the bridge and make sure it doesn’t sit on top of the mute mounting screws.
It may take a few tries, but you’ll soon find that balance. When pressing on the plate, the foam side should rise up to meet the strings but not push them up, then stay firmly in place. Pushing down on that side should disengage the mute, again with a firm action. If the mute doesn’t stay in place, or is difficult to move, take the bridge off and keep adjusting those mounting screws.

Top: disengaged. Bottom: engaged
It’s worth noting that, In order to get the mute set up correctly, your guitar will need to be shimmed as described in part two of the Demystifying series. A sufficient amount of neck angle is crucial, otherwise there may not be enough room under the bridge for the mute to be functional.
One problem that can crop up with the mute is that it pulls the strings sharp when it’s engaged. Often, this can be due to the mute sitting too high, which effectively shortens the scale length of the instrument. If that’s the case, cranking down the mounting screws should solve this issue for most players. Too-hard foam can also be the culprit, pushing up on the strings and raising pitch. Substituting a softer piece of foam here can work wonders (more on that later). Alternatively, one can easily shave off the bit of foam that touches the strings.
If you have a vintage Jaguar or Bass VI, you’re likely familiar with a problem that arises when the original foam on vintage instruments, due to age or contact with sweat: deterioration. This happens to pickup foam as well, where it hardens and compresses, rendering pickup height adjustment difficult or even impossible.

Hardened, sticky mute foam on a refinished ’63 Jaguar. You can see the gooey residue on the low E side of the mute.
If this happens to your mute foam, I have to tell you there’s no point in trying to salvage it. Touching or removing the stuff, you’ll notice that what was once foam is now a slightly gooey, sticky mess. Even on a totally original ‘60s guitar, leaving foam in this state is at the very least off-putting and potentially problematic, what with the black residue left behind on contact with skin or strings. Seriously, that stuff is disgusting.
Do yourself a favor and replace that foam. I’ll admit, it’s often the only part we’d even thing of replacing on a perfect vintage Jaguar. Replacement Fender foam can be found on eBay, but it seems that every parts supplier is out of stock right now. In a pinch, we use this. The link will take you to some weather stripping foam that’s just slightly taller than the 3/8” by 1/4” Jaguars have from the factory, but it should work like a charm. If the extra height concerns you, the same brand has a version with a height of 3/16″ as well.
Interestingly, this Mute wasn’t Fender’s first shot at string-dampening technology. Earlier, there was foam stuffed under the bridge covers of ‘50s Precision basses. The first Jazz Basses featured stiff pads for each individual string, while the later Mustang Bass bridge had similar devices. Muting may make a bit more sense on bass than guitar, but give this mute system a shot and see if you can’t make it work for your brand of music. To the author, it’s a fun sound that makes some rhythm parts more interesting, and with effects added, it can bloom into something totally unique. And weird. Definitely weird.

