Yesterday (May 19, 2013) was the 2013 Seattle-Tacoma Guitar Show at the Meydenbauer Center in Bellevue, and it was a blast! A veritable feast for the eyes for any one even mildly interested in guitars, the Guitar Show is always the perfect way to showcase the dealers, builders, artists and players as well as the fine instruments that inspire the music we connect with on a day-to-day basis.
A Plan, a Van, a Can-Do Attitude
 For Mike & Mike’s, the show started well before Sunday. We’d been carefully plotting what we would take with us for the last two weeks, when ol’ Ballsy went on a gear-buying spree using his talent for sniffing out great deals to ensure our having a bevy of beautiful guitars, amps and effects to excite the senses. (Mission accomplished!)
Last week sometime we started really deliberating on the virtues of taking some pieces with us; some were no-brainers on both sides of the spectrum – you know, this goes, that stays – but others were somewhat nebulous. For instance, we have these two massively cool Fender Twin amps, one blackface from ’66 and the other a silverface drip-edge model from ’68. Now, if you don’t know, Twins are great amps but also unwieldy, being as big and heavy as they are. The question: do we really need to bring both? At first it seemed that no, we did not. Last minute though, Mike had a change of heart and there we were, at the show with twin Twins. For the record, I’m glad we took ‘em both! Our table looked quite nice…
When you’re a dealer at the show, it’s always a good idea to get there as early as possible. The loading dock at Meydenbaur usually opens around 6:30, and because there’s only a limited number of hand carts available, the many shops and each of their host of gear translates to a LOT of waiting around. In order to get the jump on the day, we got all of our gear sorted out on Saturday night, and on Sunday morning we packed our rented van at 5:30am shoving off at 6. Not too shabby.
Staking Our Claim
 If we’re being honest, setting up our three tables took a good hour at least, not counting carting our belongings to the fourth floor via Meydenbauer’s only service elevator. But the real problem (and biggest time sink) is creating an attractive display that invites wandering eyes to hover – nay, dance – from piece to piece; while it might be easy to simply ‘put out’ guitars in some random fashion, it takes a keen eye to present them in a well-executed, thoughtful way. The three of us brought everything out, and from then on it was a series of friendly, barked opinions which sounded something like “DOES THIS GO HERE” and “I LIKE WHAT YOU’RE DOING PLEASE CONTINUE” and “YOU’RE FIRED”, but only in a j/k sort of way.
As Mike and I later conceded, three tables was exactly the right amount of space for the gear we brought; we didn’t have to stagger any of our instruments, with something like 25 guitars and 5 amps alone, not to mention the other odds and ends we had with us. And did we mention the kick-ass banner our good buddy Jake made for us? Sex appeal to the max, right there.
It Starts
After I was thrice fired and re-hired, the doors opened and the game was afoot, Dear Reader! New friends and potential customers trickled through the door and I’m proud to say that we drew a lot of really great reactions! Also presenting at the show were many of PNW’s guitar elite: Emerald City Guitars, Thunder Road Guitars, Rick King and Guitar Maniacs, amongst others. But for the first time in my life I felt like we were running with the big boys, even drawing the attentive and discerning eye of Jay Boone of Emerald City Guitars, who commented about how impressed he was with the calibre of gear we had with us. From him, that’s a huge compliment!
As the show carried on, it was clear which of our instruments were the stars of our show. Our 1967 Antiqua Fender Coronado, for instance, was the source of many hushed gasps. Also on display was the amp we’ve been calling, “the cleanest Deluxe Reverb on the planet”, a silverface Fender that is downright immaculate, shiny, and perfect. If you were ever curious what old amps looked like when brand new, do take a look at that one at our eBay store!
What was most moving for me personally was the amount of kindness and attention directed toward our stock of Mike & Mike’s Guitar Guards. Nearly every person that dropped by the table, many of whom I’m sure wouldn’t have engaged us otherwise, deliberately stopped to tell us how much they liked the idea of pickguards made from old vinyl records. Many of them took photos, asked how much we charged, how we made them, and if they could send us a particular record. Almost everyone was floored by the idea, and I shook a lot of hands simply because they’d “never thought of it!” Plainly stated, it just felt good to have that little labor of love be recognized on a large scale, and anything that gets our shop that kind of attention is a blessing.
Gear Highlights

The Teye “La Canastera”
I’m certain that what I thought was cool is going to disappoint most of the guitar lovers around; I don’t have any photos of the ’59 Gibson Les Paul across from our table, nor do I have any of the ’55 Fender Stratocaster adjacent to us either. Both were superb instruments, of course, but what really impressed me this year was the range of gear available. There were plenty of instruments that I’d either never seen before or hadn’t seen in years – things that most guitar buyers might overlook or pass on simply out of ignorance.

The first thing that caught my eye in the morning was a few tables down from us: a Teye “La Canastera”, an alluring work of art that I’ve only ever seen in magazines. I didn’t dare pick it up, but I really enjoyed being able to glance over at it throughout the day like an especially attractive young thing, too shy to strike up conversation. Honestly, it’s even more beautiful in person. The same vendor – I forgot to ask the name – also had more S-series Teye guitars in stock, including the models adorned in three-dimensional abalone pearl.
 Another surprise waiting for me at the show came in the form of two nearly identical Squier Vista Series Jagmasters, one with original pickups and one with replacements. These were guitars I greatly admired when I was in high school, but back then nobody wanted anything to do with the Squier brand, so of course we had no idea how great the guitars of the Vista Series were. I did have occasion to play a sunburst model just as they were released and I loved it, but that headstock decal made me wonder if something was going to go wrong after I bought it. I regret dismissing them so quickly, but seeing these two at the show reminded me how far I’ve come from being the biased idiot I was in high school. (SPOILER ALERT: I’m still pretty biased!)
Winner of the ‘Silliest Bass at the Show’ award was this Pink Floyd-themed Fender Jazz Bass, with airbrushed The Wall graphics all over its body. It’s sort of cool in a way, but the sad thing is this bass is actually a very early 1960s model, so I’m really curious to know what’s underneath the paint scheme. The neck, which I neglected to photograph, had new tuners and was modified for fretless play, but had its original nicotine-soaked finish.
Vendor Highlights
 Out in full regalia was the table and offerings of our good friend Joe Riggio, a Tacoma luthier that builds the most breathtaking ‘50s and ‘60s F-style guitars I’ve ever seen. Not only are his neck and body shapes super authentic but fully customizable, his finishes are hands-down the most beautiful and right I’ve ever seen. Seriously, the quality and attention to vintage detail belies the true youth of his instruments, and if you ever get a chance to just touch them, you’d likely agree that there’s no way these are new guitars. They look, feel, sound and play far better than any relic you’ll run across, and if we ever start making our own brand of custom offsets, we’re gonna give this guy a call. He’s our favorite.
Also at the show was another of our favorite guitar finish gurus: Gord Miller. Say you had a 1950s Les Paul Jr. double-cut that was stripped and had a broken neck. If you brought such a guitar to us, of course we’d be happy to repair the neck, but when it comes to restoration, it’s Gord for us all the way. Seriously, his finishes aren’t your run-of-the-mill kind of relic job; with a dedication to authentic finish techniques, the right laquer colors and formulas, and dead-on wear and checking patterns, you’d be hard-pressed to tell his work apart from the real thing. Go to his website, which has a quiz of sorts on his website, begging you to guess which guitar pictured is a refin, a near impossible feat! Just check out that Les Paul Custom! He even had a display of vintage-correct colors sprayed on squares detailing the original look and his various levels of aging! Really impressive!
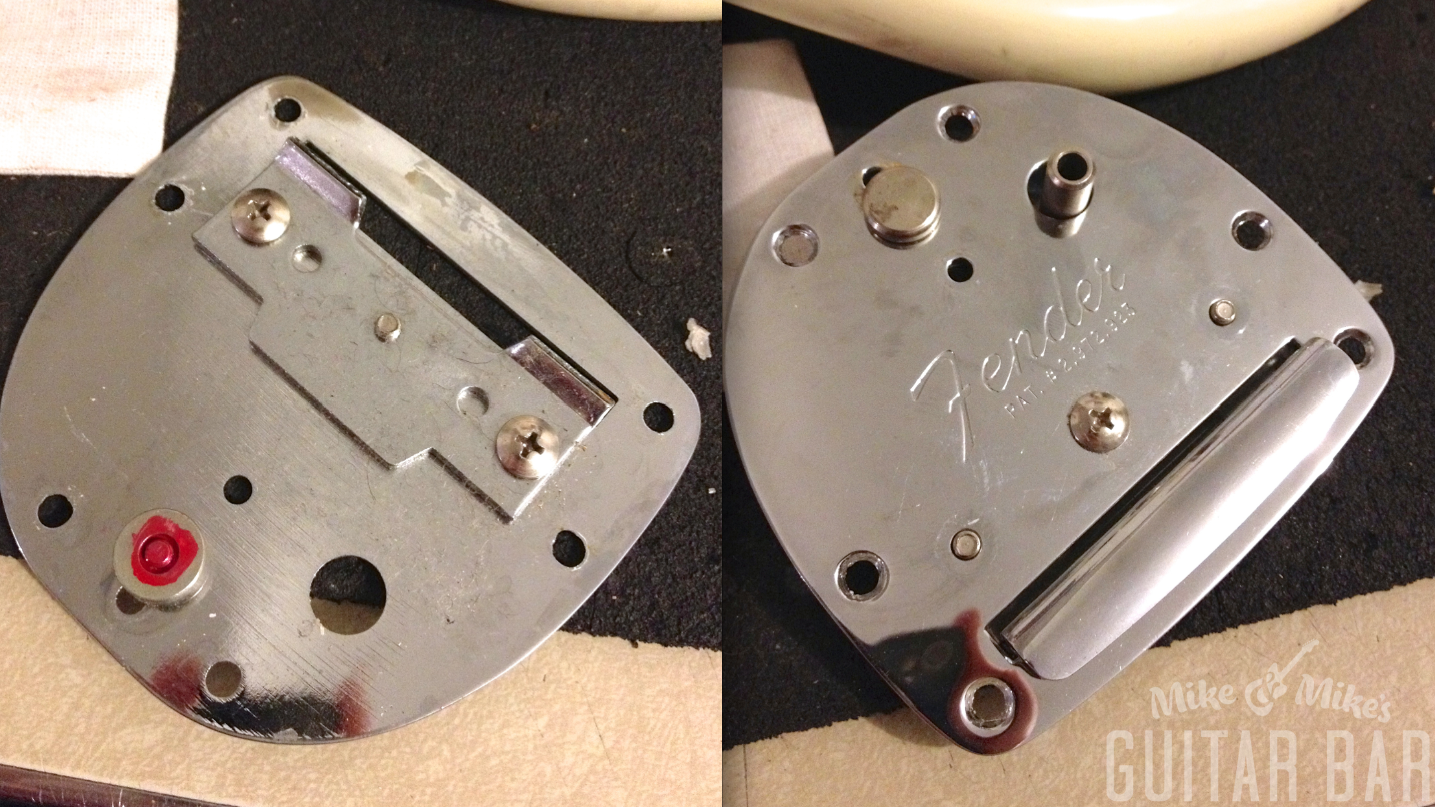
The most truly exciting discovery I made that day came by way of the proprietor of eBay store fenderparts, and let me tell you, I’m completely stoked over this guy’s work. He stopped by the table to congratulate us on our vinyl pickguards, asking questions and telling me how great the idea was. He mentioned that he made pickguards himself, and while I was interested I didn’t expect the level of work he was doing. He showed me his wares at his table, and in all honestly, I don’t think I’ll ever buy a guard from any one else, ever. Why? This man is fighting the good fight!
His guards are exactly the right color, shape and are cut with an attention to vintage detail that I just haven’t seen from other parts resources. His mint green ‘60s guards are the perfect color and has the correct middle black layer, and his tortoise shell is not only more beautiful than most repro guards, but they’re actually made of genuine celluloid sourced from Italy. Add to that the fact that his aging process – which he wouldn’t divulge – is both tasteful and produces a guard that’s a dead ringer for the real thing. Seriously, you honestly cannot find another retailer that’s doing it as right as fenderparts. If you didn’t know better, it would be hard to tell it apart from the real thing. I’ll be picking one up ASAP! And if fenderparts is reading this, I am SO sorry for forgetting your name. I’m the worst. I’ll be ordering my Jazzmaster guard very soon!
Shaking Hands and Kissing Babies, but not the Other Way Around

Detail of the Stratocaster guard made by fenderparts, which you can find easily on eBay. Amazing stuff!
Look, honestly the reason we go to these guitar shows isn’t that we think we’re going to clean house and sell everything we bring; to think that way would be a total error of logic and purpose. The Guitar Show is really about connection with customers (we’ll call them new friends) and other vendors, and when that’s your criteria for success there’s no way you can lose. We made a lot of great connections throughout the day, gave out a bunch of business cards and price lists, and if that was it we’d be thrilled. Job well done, all of that.
Icing on the cake: we sold a few things, among which was the dreadnaught case we provided to the husband of the elevator attendant at the convention center, which was a great way to start the day. We also sold two very old parlor guitars (one from the 1880s and the other from 1920) to Mike McCready of Pearl Jam, and he couldn’t have been a nicer guy. And yes, we were all pretty excited to speak with him, especially Matt. We’re all big fans!
What a day. A 12+ hour day, but a great one nonetheless.
All in all, the 2013 Seattle-Tacoma Guitar Show was a lot of fun and we loved meeting all of you that came by the booth! Thanks for making us feel like the belle of the ball!
And to think, I didn’t hear “Smoke on the Water” even once…

Gord Miller finish sample goodness!
– Michael James Adams